OpenKruise (https://openkruise.io) is a suite of Kubernetes-based extensions focused on automating cloud-native applications, such as deployment, publishing, operations and availability protection. The majority of the capabilities provided by OpenKruise are defined based on CRD extensions, which do not exist in any external dependencies and can run on any pure Kubernetes cluster; Kubernetes itself provides some application deployment management capabilities that are not sufficient for large-scale application and cluster scenarios, and OpenKruise bridges the gap between Kubernetes in the areas of application deployment, upgrades, protection, and operations and maintenance.
OpenKruise provides some core capabilities as follows:
- Enhanced Versions of Workloads: OpenKruise includes a range of enhanced versions of workloads such as CloneSet, Advanced StatefulSet, Advanced DaemonSet, BroadcastJob, etc. They not only support basic functionality similar to Kubernetes’ native workloads, but also offer things like in-place upgrades, configurable scaling/release policies, concurrent operations, and more. In particular, in-place upgrades are a new way to upgrade application container images and even environment variables, rebuilding only specific containers in a Pod with new images, leaving the entire Pod and the other containers within it unaffected. This results in faster releases and avoids negative impacts on other components such as Scheduler, CNI, CSI, etc.
- Bypass management of applications: OpenKruise offers several ways to manage application sidecar containers, multi-region deployments, via bypass. Bypassing means that you can implement them without having to modify the application’s Workloads. For example, SidecarSet can help you inject specific sidecar containers into all matching Pods when they are created, or even upgrade an already injected sidecar container image in-place without affecting other containers in the Pod. WorkloadSpread can constrain the regional distribution of Pods scaled out of stateless workloads, giving a single workload the ability to deploy multiple regions and elasticity.
- High Availability Protection: OpenKruise protects your Kubernetes resources from cascading deletion mechanisms, including CRD, Namespace, and almost all workloads type resources. PodUnavailableBudget protects against Pod Deletion, Eviction, Update, and many other voluntary disruption scenarios, as opposed to Kubernetes’ native PDB, which only provides protection against Pod Eviction.
- Advanced Application Ops: OpenKruise also offers a number of advanced Ops capabilities to help you better manage your applications, such as the ability to pre-pull certain images on an arbitrary range of nodes via ImagePullJob, or to specify that one or more containers in a Pod be restarted in-place.
Architecture
The following diagram shows the overall architecture of OpenKruise:
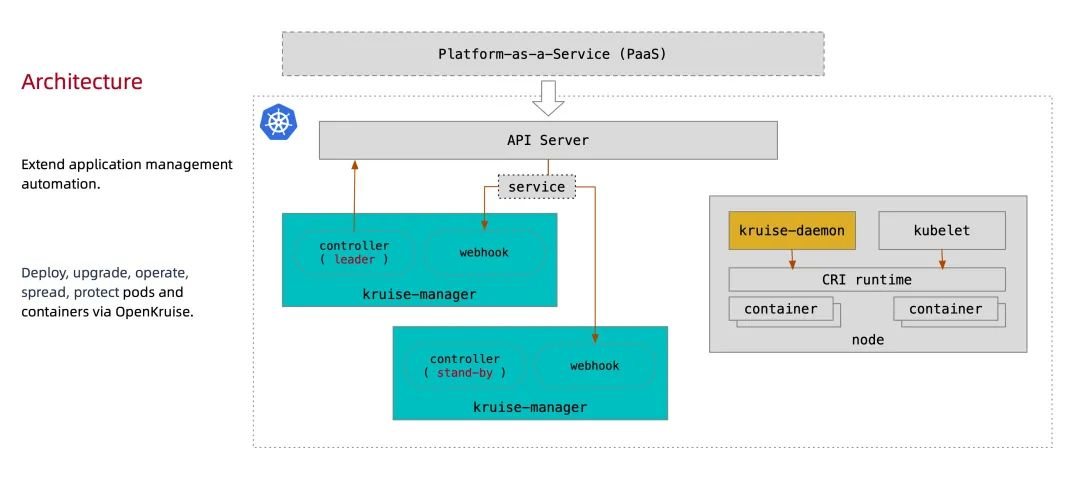
All OpenKruise functionality is provided through the Kubernetes CRD. One of the central components running the controller and webhook is Kruise-manager, which is deployed via Deployment in the kruise-system namespace. Logically, controllers such as cloneset-controller and sidecarset-controller run independently, but to reduce complexity they are packaged in a separate binary and run in kruise-controller-manager-xxx in a Pod. In addition to the controller, kruise-controller-manager-xxx contains the admission webhook for the Kruise CRD and Pod resources. Kruise-manager creates webhook configurations to configure which resources that need to be handled sensitively, and provide a service for kube-apiserver to call.
A new Kruise-daemon component is available from v0.8.0, which is deployed to each node via DaemonSet and provides functions such as image warm-up, container restart, etc.
Installation
Here we also use the Helm method of installation, but note that from v1.0.0 onwards, OpenKruise requires installation and use in clusters with Kubernetes >= 1.16 or higher.
First add the charts repository:
Then install the latest version of the application by executing the following command:
|
|
This charts defines the namespace as kruise-system by default in the template, so you can leave it unspecified during installation.
For users in mainland China, if your environment does not have access to the official DockerHub image, you can use the following command to replace the image with AliCloud’s mirror service.
1➜ helm upgrade --install kruise openkruise/kruise --set manager.image.repository=openkruise-registry.cn-shanghai.cr.aliyuncs.com/openkruise/kruise-manager --version 1.3.0
When the application is deployed, two pods of kruise-manager will run under the kruise-system namespace, and they will also be elected by leader-election, so that only one is available at the same time for high availability, and the kruise-daemon component will be started as a DaemonSet. kruise-daemon` component as a DaemonSet.
|
|
If you do not want to use the default parameters for installation, you can also customise the values that can be configured by referring to the charts documentation at https://github.com/openkruise/charts.
CloneSet
The CloneSet controller is an enhancement to the native Deployment provided by OpenKruise, and is used in much the same way as Deployment, as shown in the following declaration of a CloneSet resource object:
|
|
Create the above CloneSet object directly.
|
|
After the object is created, we can check the corresponding Events information through the kubectl describe command, and we can see that the cloneset-controller is a Pod created directly. This is different from the native Deployment, where the Deployment is created through the ReplicaSet, so we can also see that the CloneSet manages the Pod directly, and the 3 replicas of the Pod have been created successfully.
Although CloneSet is similar to Deployment in terms of use, it has many more advanced features than Deployment, which are described in more detail below.
Expansion and reduction of capacity
Streaming Scaling
CloneSet can limit the size of the scaling step when scaling with ScaleStrategy.MaxUnavailable so that it has the least impact on the service application, either by setting an absolute value or a percentage, or by not setting the value to indicate no limit.
For example, we add the following data to the manifest above:
Above we have configured scaleStrategy.maxUnavailable to 1, and combined with the minReadySeconds parameter, this means that when scaling, the CloneSet will only create the next Pod when the last scaled Pod has been ready for more than a minute.
For example, here we expand to 5 copies and check the events of the CloneSet after updating the above objects.
|
|
You can see that one Pod was expanded first, and since we configured minReadySeconds: 60, it took more than 1 minute for the newly expanded Pod to be created before the other Pod was expanded, and the Events message above shows this. Looking at the Pod’s AGE also shows that there was a gap of about 1 minute between the 2 Pods that were expanded.
When a CloneSet is scaled down, we can also specify some Pods to be deleted, which is not possible with StatefulSet or Deployment, where Pods are deleted based on serial number, and Deployment/ReplicaSet, which can currently only be deleted based on the ordering defined in the controller. CloneSet, on the other hand, allows users to specify the name of the Pods they want to delete while narrowing down the number of replicas, as follows:
After updating the manifest above, the application will be reduced to 4 Pods and if a Pod name is specified in the podsToDelete list, the controller will remove these Pods first and the Pods that have been removed will be automatically cleaned up from the podsToDelete list by the controller. For example, if we update the manifest above, the Pod cs-demo-n72fr will be removed and the rest will remain.
If you only add the Pod name to podsToDelete, but do not change the number of replicas, then the controller will first delete the specified Pod and then expand a new one. Another way to delete a Pod directly is to tag the Pod to be deleted with apps.kruise.io/specified-delete: true.
Instead of manually deleting the pod directly, using podsToDelete or apps.kruise.io/specified-delete: true will have the CloneSet’s maxUnavailable/maxSurge to protect the deletion and will trigger the PreparingDelete lifecycle hooks.
PVC Templates
In a unique feature, CloneSet allows users to configure PVC templates volumeClaimTemplates to generate a unique PVC for each Pod, which is not supported by Deployment. As it is often the case that stateful applications need to have separate PVCs, here are some things to keep in mind when using CloneSet’s PVC templates:
-
Each PVC that is automatically created will have an
ownerReferencepointing to the CloneSet, so when the CloneSet is deleted, all Pods and PVCs created by it will be deleted. -
Each Pod and PVC created by a CloneSet will have an
apps.kruise.io/cloneset-instance-id: xxxlabel, the associated Pod and PVC will have the sameinstance-idand their names will be suffixed with thisinstance-id. -
If a Pod is deleted by the CloneSet controller, all the PVCs associated with the Pod will be deleted together.
-
If a Pod is deleted or evicted by an external call, all the PVCs associated with the Pod still exist; and when the CloneSet controller finds that there is not enough capacity to re-expand, the newly expanded Pod will reuse the
instance-idof the original Pod and associate it with the original PVCs. -
When a Pod is rebuilt and upgraded, the associated PVC will be deleted and created along with the Pod.
-
When a Pod is upgraded in-place, the associated PVC will continue to be used.
The following is an example with PVC stencils:
|
|
For example, the application of the resource object above will automatically create 3 Pods and 3 PVCs, each of which will mount a PVC:
|
|
Upgrades
CloneSet offers a total of 3 upgrade methods:
-
ReCreate: Deletes the old Pod and its PVCs, then recreates them with the new version, this is the default method -
InPlaceIfPossible: Tries to upgrade the Pod in-place first, then rebuilds it if that doesn’t work -
InPlaceOnly: only in-place upgrades are allowed, so the user can only modify the restricted fields in the previous article, and attempts to modify other fields will be rejected
Here is an important concept: InPlaceUpgrade, which is one of the core features provided by OpenKruise, when we want to upgrade a image in a Pod, the following diagram shows the difference between RebuildUpgrade and InPlaceUpgrade:
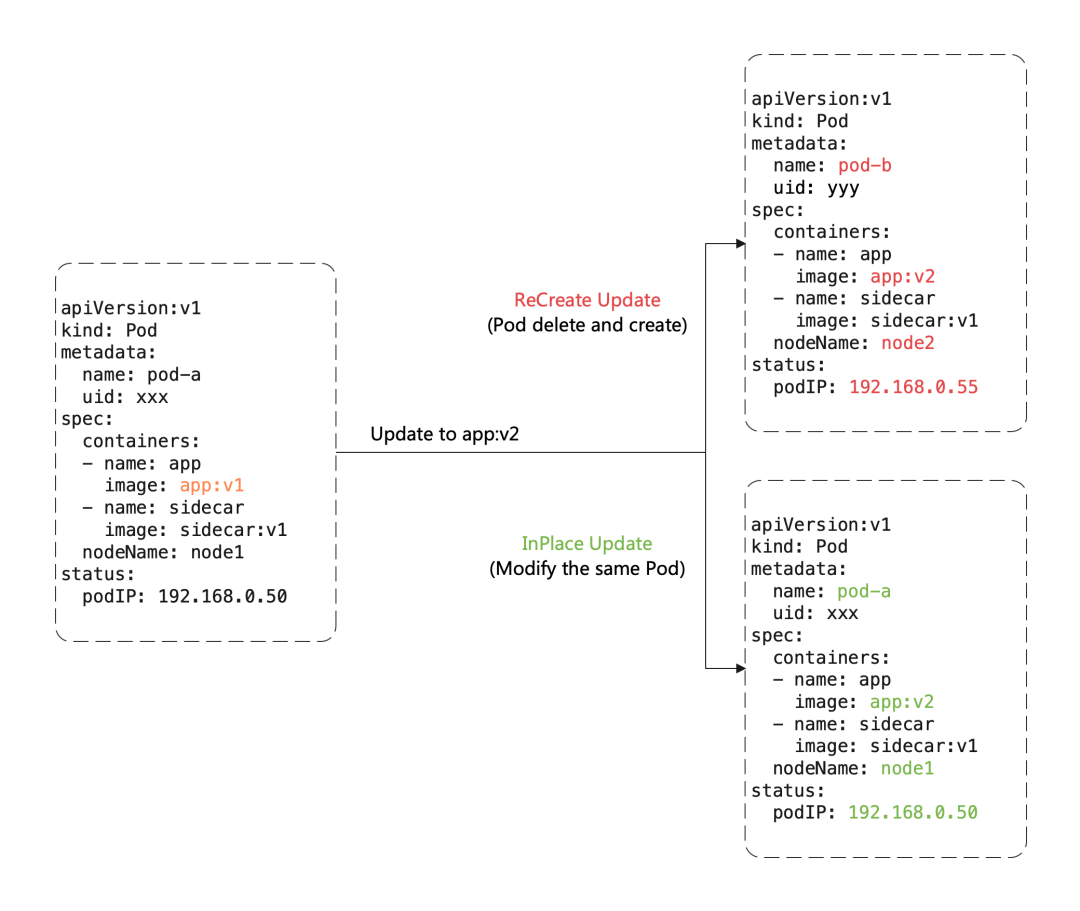
Rebuild Upgrade We need to delete the old Pod and create the new Pod:
- Pod name and uid change because they are two completely different Pod objects (e.g. Deployment upgrade)
- Pod name may remain the same, but uid changes, because they are different Pod objects, just reusing the same name (e.g. StatefulSet upgrade)
- Pod’s Node name may change, as the new Pod will probably not be dispatched to the previous Node node
- Pod IP changes, as the new Pod will most likely not be assigned to the previous IP address
But for in-place upgrades, we still reuse the same Pod object, just modifying the fields inside it:
- additional operations and costs such as scheduling, assigning IPs, mounting volumes, etc. can be avoided
- Faster image pulling, as most of the layer layers of the old image are reused and only some of the changed layers of the new image need to be pulled
- When a container is upgraded in-place, the other containers in the Pod are not affected and remain operational
So obviously if we can upgrade our workloads with InPlaceIfPossible, the impact on the online application is minimal. We mentioned above that the CloneSet upgrade type supports InPlaceIfPossible, which means that Kruise will try to do in-place upgrades for Pods, or degrade to rebuild upgrades if this is not possible, and the following changes will be allowed to perform in-place upgrades:
- Update
spec.template.metadata.*in the workload, e.g. labels/annotations, and Kruise will only update the changes in the metadata to the stock Pod. - By updating
spec.template.spec.containers[x].imagein the workload, Kruise will upgrade the images of those containers in the Pod in-place, without rebuilding the entire Pod. - Starting with Kruise v1.0, if
spec.template.metadata.labels/annotationsis updated and containers are configured with env from these changedlabels/anntations, Kruise will upgrade these containers in-place to take effect with the new env values.
Otherwise, changes to other fields, such as spec.template.spec.containers[x].env or spec.template.spec.containers[x].resources, are rolled back to rebuild the upgrade.
For example, if we set the above application update method to InPlaceIfPossible, we just need to add spec.updateStrategy.type: InPlaceIfPossible to the manifest.
After the update, we can see that the status of the Pod has not changed much. The name and IP are the same, the only thing that has changed is the image tag:
|
|
This is the effect of the in-place upgrade and the overall workflow of the in-place upgrade is shown in the following diagram:
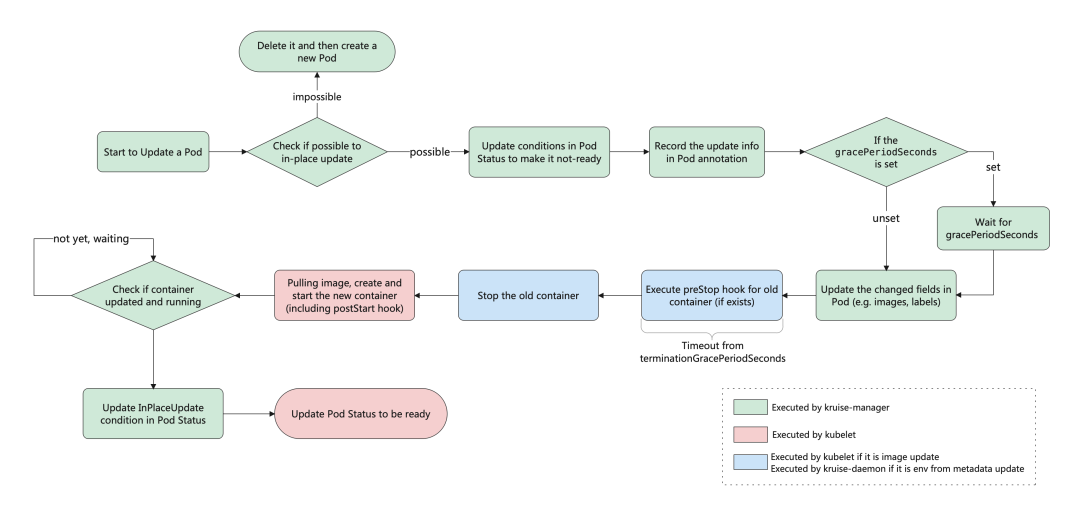
If you enable the feature-gate PreDownloadImageForInPlaceUpdate when installing or upgrading Kruise, the CloneSet controller will automatically pre-warm the new version of the image you are canarying on the node where all the old version pods are located, which is helpful to speed up app releases.
By default, CloneSet preheats each new image with a concurrency of 1, i.e. pulling images one node at a time, but if you need to adjust this, you can set the concurrency in CloneSet via the annotation apps.kruise.io/image-predownload-parallelism.
Also starting with Kruise v1.1.0, it is possible to use apps.kruise.io/image-predownload-min-updated-ready-pods to control that the image warm-up is performed after a small number of new versions of the Pod have been successfully upgraded. The value can be an absolute number or a percentage.
Note that in order to avoid most unnecessary image pulls, only CloneSet with
replicas > 3is currently being automatically warmed up.
In addition CloneSet supports batching of canary releases, in the updateStrategy property you can configure the partition parameter, which can be used to keep the number or percentage of Pods from older versions, default is 0:
- If it is a number, the controller will update the
(replicas - partition)number of Pods to the latest version - If it is a percentage, the controller will update the
(replicas * (100% - partition))number of Pods to the latest version
For example, if we update the image in the example above to nginx:latest and set partition=2, we can see after the update that only 2 Pods have been updated.
|
|
In addition, CloneSet supports some more advanced uses, such as defining priority policies to control the priority rules for Pod releases, defining policies to break up a class of Pods throughout the release process, and suspending Pod releases.
Life cycle hooks
Each Pod managed by a CloneSet will have an explicit state it is in, marked by lifecycle.apps.kruise.io/state in the Pod label:
Normal: normal statePreparingUpdate: preparing for in-place upgradeUpdating: in-place upgrade in progressUpdated: in-place upgrade completePreparingDelete: ready for deletion
The lifecycle hook, on the other hand, enables custom actions (such as switching traffic, alarms, etc.) before and after in-place upgrades and before deletions by jamming in the above state flow. preDelete and inPlaceUpdate are the main properties supported under lifecycle of CloneSet.
|
|
Set it to NotReady before upgrading/removing Pods
- If
preDelete.markPodNotReady=trueis set.- Kruise will set the Pod Condition
KruisePodReadyto False when the Pod enters thePreparingDeletestate, and the Pod will become NotReady.
- Kruise will set the Pod Condition
- If
inPlaceUpdate.markPodNotReady=trueis set.- Kruise will set the Pod Condition of KruisePodReady to False when the Pod enters the
PreparingUpdatestate, and the Pod will become NotReady. - Kruise will try to set the KruisePodReady Pod Condition back to True.
- Kruise will set the Pod Condition of KruisePodReady to False when the Pod enters the
We can use this feature to prevent traffic loss by excluding traffic from the Pod before the container is actually stopped.
Flow diagram
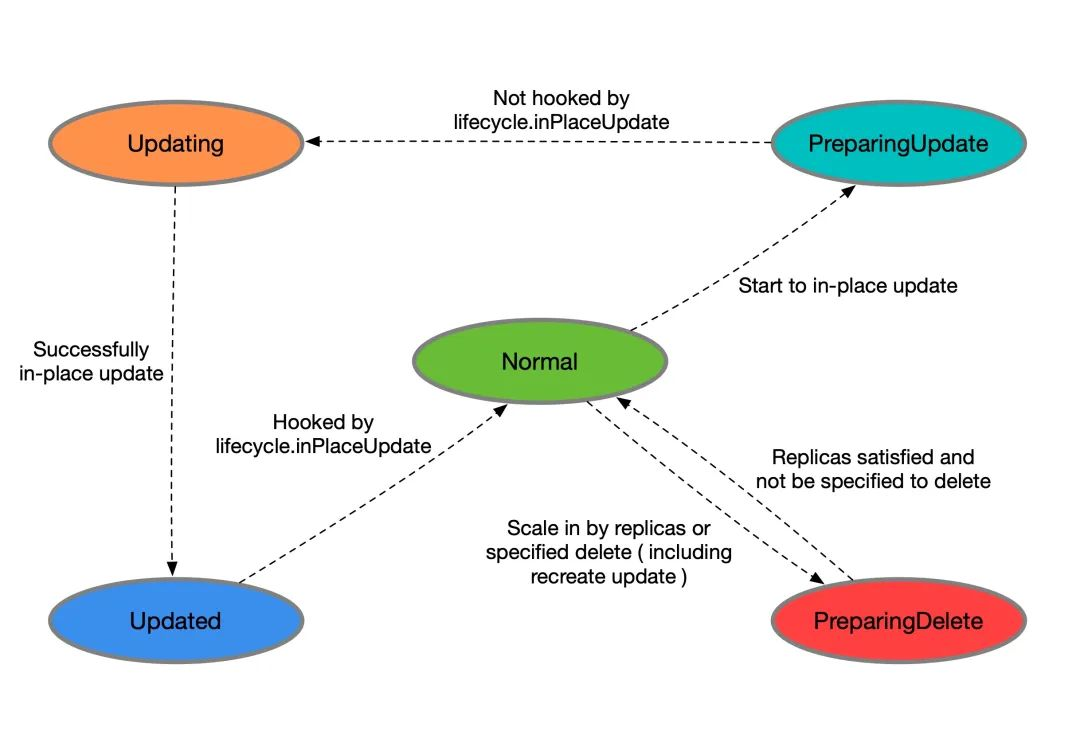
-
When the CloneSet deletes a Pod (including normal scaling and rebuild upgrades):
- If no lifecycle hook is defined or the Pod does not meet the preDelete condition, it is deleted directly.
- Otherwise, just change the Pod state to
PreparingDeletefirst. After the user controller has finished removing the label/finalizer and the Pod does not meet the preDelete condition, kruise performs the Pod deletion. - Note that Pods in the
PreparingDeletestate are in the deletion phase and will not be upgraded.
-
When a CloneSet upgrades a Pod in-place:
- Before the upgrade, if a lifecycle hook is defined and the Pod meets the
inPlaceUpdatecondition, change the Pod state toPreparingUpdate - After the user controller has completed the task of removing the label/finalizer and the Pod does not meet the
inPlaceUpdatecondition, kruise changes the Pod state toUpdatingand starts the upgrade - After the upgrade is complete, if the lifecycle hook is defined and the Pod does not meet the
inPlaceUpdatecondition, change the Pod state to Updated - When the user controller completes the task with the label/finalizer and the Pod meets the
inPlaceUpdatecondition, kruise changes the Pod state to Normal and determines that the upgrade was successful
- Before the upgrade, if a lifecycle hook is defined and the Pod meets the
With regard to returning to the Normal state from PreparingDelete, this is supported by design (by undoing the specified deletion), but we generally do not recommend this usage. As Pods in the PreparingDelete state are not upgraded, they may go back into the release phase immediately after returning to the Normal state, which is a problem for users dealing with hooks.
Example of user controller logic
As per the above example, you can define:
example.io/unready-blocker finalizeras a hookexample.io/initialingannotation as an initialisation tag
Include this field in the CloneSet template.
|
|
The logic of the user controller is then as follows:
- For Pods in the Normal state, if the annotation has
example.io/initialing: trueand the ready condition in the Pod status is True, access the traffic and remove the annotation. - For Pods in the
PreparingDeleteandPreparingUpdatestates, cut the traffic and remove theexample.io/unready-blockerfinalizer - For Pods in the Updated state, access the traffic and tag
example.io/unready-blocker finalizer
Usage Scenarios
For a variety of historical and objective reasons, some users may not be able to Kubernetesize their entire company architecture. For example, some users are temporarily unable to use the service discovery mechanism provided by Kubernetes itself, and instead use a separate service registration and discovery system independent of Kubernetes. In such an architecture, users may encounter many problems if they Kubernetesize their services. For example, whenever Kubernetes successfully creates a Pod, it needs to register the Pod with the Service Discovery Centre itself in order to be able to provide services internally and externally; accordingly, if you want to take a Pod offline, you usually have to remove it from the Service Discovery Centre before you can gracefully take it offline, which may result in a loss of traffic. In the native Kubernetes system, however, the lifecycle of a Pod is managed by a Workload (e.g. Deployment), and when the Replicas field of these Workloads changes, the corresponding Controller will immediately add or remove the Pod, making it difficult for users to customize the lifecycle of a Pod.
There are two general solutions to this problem: one is to constrain the resilience of Kubernetes, for example by restricting the scaling of a workload to a specific link, so that the Pod IP is removed from the service registry before the Pod is deleted. This would limit the resilience of Kubernetes itself and increase the difficulty and risk of link control. The second is to fundamentally revamp the existing service discovery system, which is obviously a much longer and riskier task.
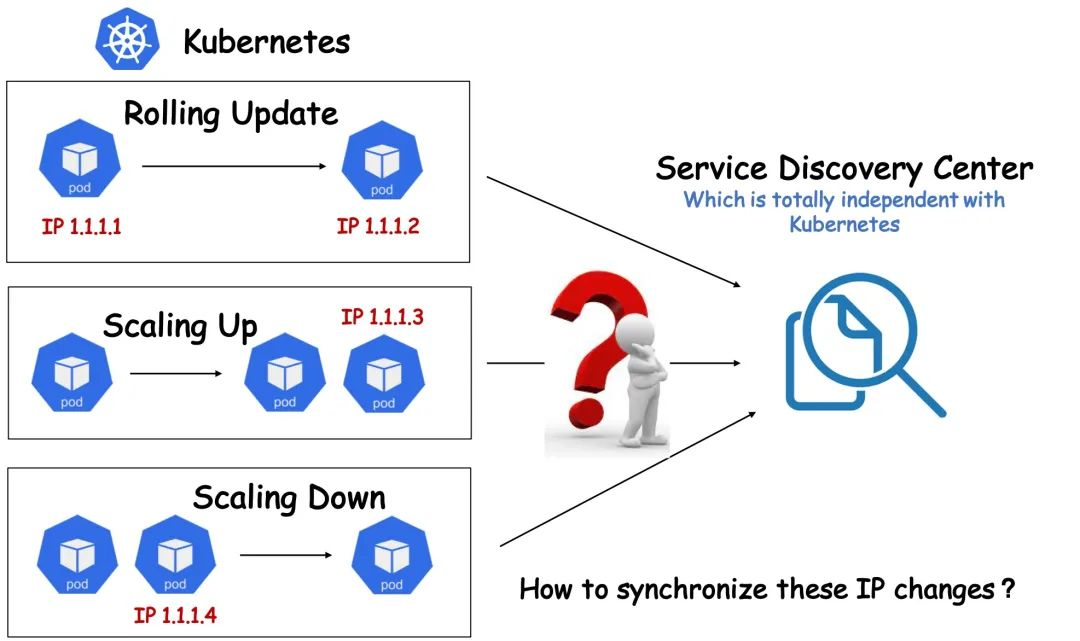
Is there a way to take full advantage of Kubernetes’ resiliency capabilities while avoiding the need to modify existing service discovery systems and quickly bridge the gap between the two systems?
The OpenKruise CloneSet provides a set of highly customisable extensions for this type of scenario, allowing users to manage the Pod lifecycle in a more granular and customised way; the CloneSet sets aside Hooks at several important time points in the Pod lifecycle, allowing users to insert customised extensions at these time points actions. For example, remove the Pod IP from the Service Discovery Center before the Pod upgrade, and then register the Pod IP to the Service Discovery Center after the upgrade is completed, or do some special sniffing and monitoring actions.
Let’s assume that we now have a scenario where
- users do not use Kubernetes Service as a service discovery mechanism, and the service discovery architecture is completely independent of Kubernetes;
- Using CloneSet as a Kubernetes workload.
and make the following reasonable assumptions about the specific requirements:
- When a Kubernetes Pod is created:
- When the Pod IP is registered to the Service Discovery Center after the creation is successful and the Pod is Ready;
- When a Kubernetes Pod is upgraded in-place:
- The Pod IP needs to be removed from the Service Discovery Centre (or actively FailOver) before the upgrade can take place;
- After the upgrade is complete and the Pod is Ready, register the Pod IP to the Service Discovery Center again;
- When a Kubernetes Pod is deleted:
- the Pod IP needs to be removed from the Service Discovery Centre before it can be deleted;
Based on the above assumptions, we can actually use CloneSet LifeCycle to write a simple Operator to implement a user-defined Pod lifecycle management mechanism.
As mentioned earlier, CloneSet LifeCycle defines the life cycle of a Pod as 5 states, and the logic for transitioning between the 5 states is controlled by a state machine. We can select only one or more of these states that we care about, write a standalone Operator to implement the transitions, control the Pod’s lifecycle, and insert our own custom logic at the time points we care about.
|
|
We’ve explained how to develop an Operator in the previous CRD chapter, so we won’t go over the process here, we’ll just give you the core code for the controller:
|
|
The four branches in the above code correspond to the four important declaration cycle nodes from top to bottom, such as after creation, before upgrade, after upgrade and before deletion of the Pod, etc. We can refine the corresponding Hooks according to our actual needs, and the behaviors of the above Hooks here are as follows
postRegistry(pod *v1.Pod): sends a request to notify the Service Discovery Centre to register the Pod service;postFailOver(pod *v1.Pod): sends a request to notify the Service Discovery Center of a Fail Over of the Pod service;postUnregiste(pod *v1.Pod): sends a request to notify the Service Discovery Center that the Pod service is being logged out.
This is the power of the CloneSet Lifecycle and we can insert custom logic into the Pod Lifecycle management as required.