The Kubernetes Resource Orchestration Series, starting from the underlying Pod YAML, progressively explains related content, hoping to answer some of your questions about Kubernetes and give users a deeper understanding of cloud-native related technologies.
01 Pod Overall Structure
The overall structure of Pod YAML can be initially divided into Resource, Object, Spec and Status. This article will focus on each of these four parts.
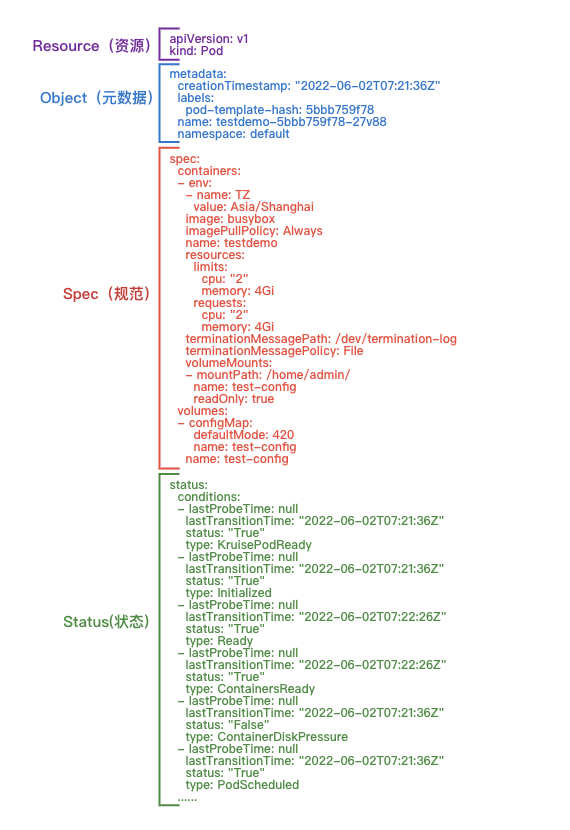
- Resource: Defines the type and version of the resource, as a mandatory attribute to get the resource from the Rest API.
- Object: The metadata property of the resource, specifying the basic identification of the resource.
- Spec / Status.
- Spec: Defines the expected state of the resource, including user-supplied configuration, system extension defaults, and surrounding system initialization or change values (scheduler, hpa, etc.).
- Status: Defines the current state of the resource so that the pod keeps moving closer to the desired state based on the assertive configuration defined by Spec.
02 Resource - Rest API
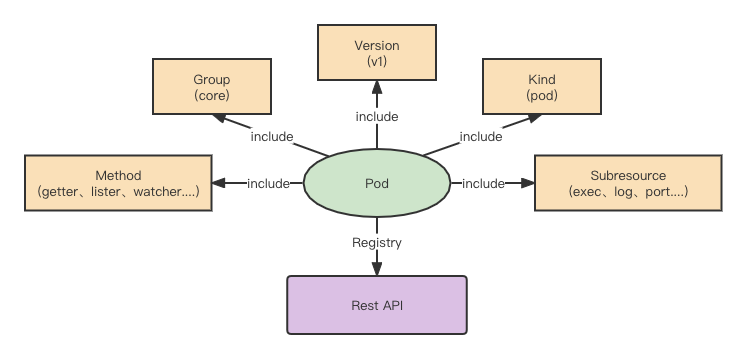
k8s resources according to Scope can be divided into Namespace resources, Cluster resources, Namespace in k8s can be considered the effect of soft tenants to achieve resource-level isolation, Pod resources are part of the Namespace resources, and Namespace is not only reflected in the YAML parameters, but also expressed in the k8s Rest API.
The overall structure of the Rest API, with Pod as an example.
Based on the above YAML, it is clear that the namespace is default, the name is test-pod Pod resource object, that is, it is clear that the Pod is Namespace resource, the Pod resource object corresponds to the apiVersion of v1, the subsequent k8s since the inline related Group is /api, naturally, we will separate the data of the object.
- group: api
- apiVersion: v1
- kind: Pod
- name: test-pod
- namespace: default
Based on the above data presentation, apiserver will naturally register the following rest api accordingly.
/api/{apiVersion}/{kind}: the list of all resources under this kind/api/{apiVersion}/namespace/{namespace}/{kind}/: the list of all resources of the current namespace under this kind/api/{apiVersion}/namespace/{namespace}/{kind}/{name}: a list of resources named name of the current namespace under this kind/api/{apiVersion}/namespace/{namespace}/{kind}/{name}/{subresource}: the subresource operations under the current namespace with the name of the resource under the kind
Later, based on the extension, we need to specify the method, so that a truly complete Rest API is born.
03 Object (metadata)
The rest api specifies the resource’s kind, apiVersion, and namespace, name of the Object, and as a public structure that all k8s resource objects refer to, there are naturally many public mechanisms for use.
|
|
Looking at the above YAML, let’s organize it a bit, there are some fields like this:
- namespace: Generally speaking, the resource object is only used by Namespace resources
- name: is the name of the resource instance
- uid: is the unique identifier of the resource, which can distinguish between deleted and recreated resource instances with the same name
- resourceVersion: is the internal version of k8s, with a time attribute, based on which it can be clear when the resource pair was changed, but also to ensure that the k8s list-watch core mechanism
- creationTimestamp: the time when the resource instance was created
- deleteTimestamp: The time when the resource instance is deleted, which will be applied in the pod’s lifecycle
- ownerReferences: Resource subordinate object, from the above yaml can be seen, the Pod resource subordinate named testdemo-5bb759f78, ownerReferences internal is no namespace parameter, that is, ownerReferences do not allow across namespace, the resource can be built up from the bottom to the top
- labels: labels, k8s within the service discovery and the corresponding soft association, are based on the operation of the label, such as testdemo-5bb759f78 replicaset labelselector (label filter) can filter to the current Pod’s label, to ensure that the association between the two from the top to the bottom of the establishment
- annotations: annotations are usually provided as additional fields for peripheral systems, for example, the current k8s.aliyun.com/pod-eni=“true” is provided for network systems
label & labelSelector
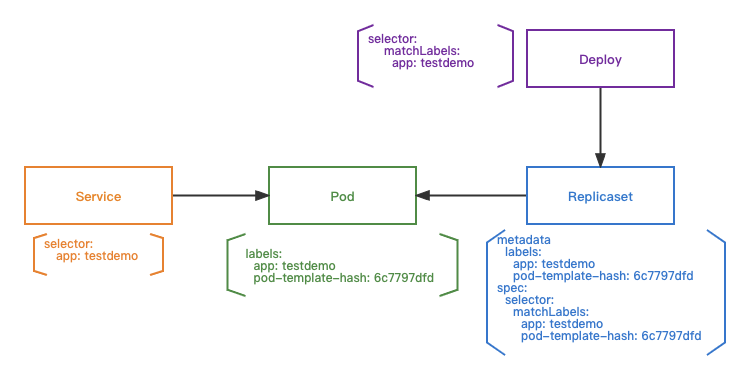
Deployment will filter out the replicaset according to its own labelseletor: app=taihao-app-cluster and calculate the hash lable of podtemplate: pod-template-hash: 5b8b879786 , and then filter out the replicaset according to its own labelselector. The replicaset is then filtered by its own labelselector to match the pods, and the corresponding service discovery service is filtered by its labelselector to match the pods.
Owner & GC
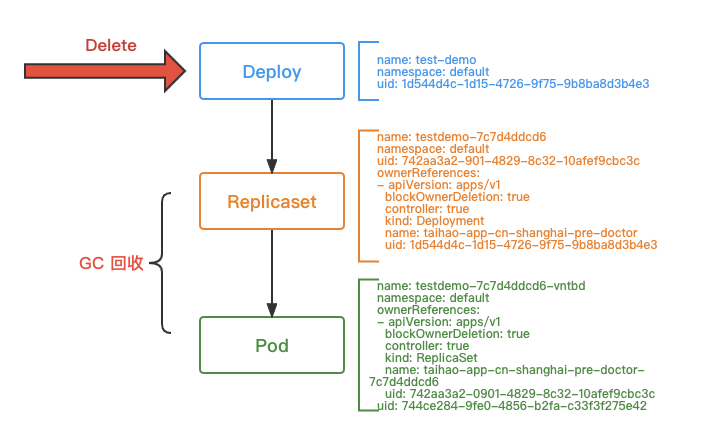
Based on Pod’s metadata.ownerReferences to find the corresponding replicaset, replicaset based on its own metadata.ownerReferences to find the deployment; when the deployment is deleted, based on the tree built by the original owner, recycling The original rs and pods.
Deploy & Replicaset
Based on label&labelselector, the top-to-bottom filtering induction is clarified; based on owner&GC, the recycling process of associated resources is clarified.
|
|
replicaset.spec.replicas: the number of instances, the number of Pods under rs controlreplicaset.spec.selector: filter the corresponding Pods based on labelreplicaset.spec.template: the Pods created by replicaset will be based on podtemplatereplicaset.status: replicaset’s current status of managed Pods
|
|
deploy.spec.replicas: deploy expected pod instance formatdeploy.spec.revisionHistoryLimit: deploy manages the retention of replicaset for three monthsdeploy.spec.selector: deploy filters for matching tagsdeploy.spec.strategy: deploy’s upgrade strategydeploy.template: the pod format that deploy will create based on this template
04 Spec
Spec, as the desired state of Pod, to some extent also covers the logic of the complete life cycle of Pod, which is divided into the following phases.
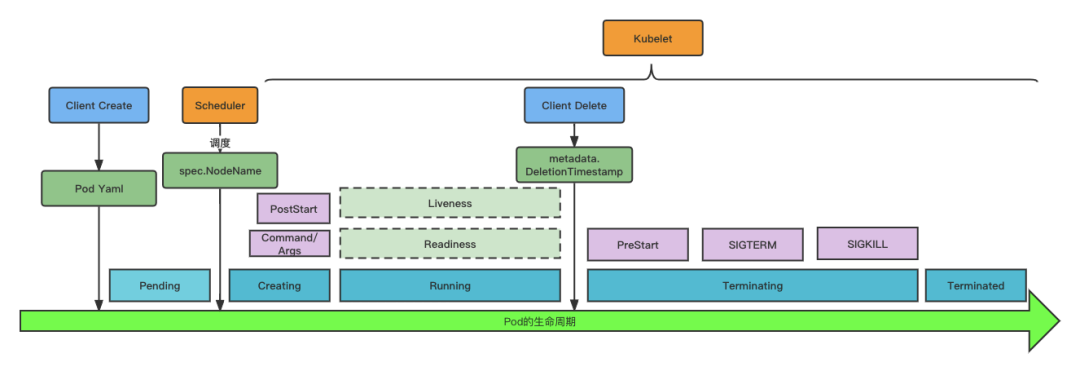
Pending: means the Pod is in the undispatched stageCreating: The kubelet on the node has discovered the Pod and is in the creation phaseRunning: At least one container is running and the kubelet will initiate health monitoringTerminating: Pod is in a deleted state, kubelet starts recycling containersTerminated: Pod destruction is complete
Pod Lifecycle: Pending
After the Pod resources are created, they are in the unscheduled stage, and the scheduler is scheduled based on the configuration of the pod yaml itself and the state of the node resources.
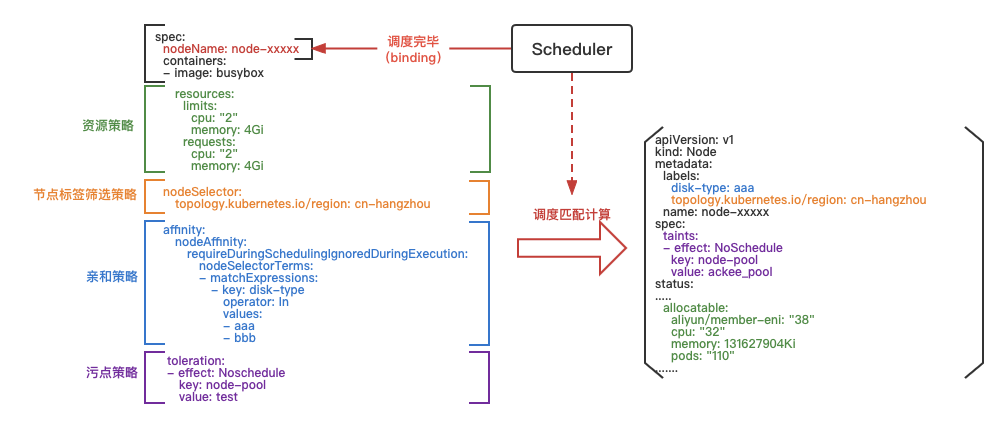
The scheduler will go to analyze the podyaml, extract the policy from it, and match it with the node configuration in the node group. If the match is successful, it will select the best node, re-modify the pod yaml, and update the spec.nodeName to finish the whole scheduling session.
Resource Policy
The resource policy indicates the resources needed to run the Pod. Take the demo as an example, the Pod needs 2 cores and 4G resources, so the node that dispatches the Pod also needs to have 2 cores and 4G resources left in order for the Pod to run on that node.
Node Label Filtering Policy
Node tag filtering policy to filter the existence of nodes for topology.kubernetes.io/region: cn-hangzhou
Affinity policy
Affinity policy, there are node affinity and Pod affinity (Pod is located in the node priority scheduling), routinely can be prioritized to meet the affinity on the node, the current example is the node affinity, meet the label disk-type=aaa or disk-type=bbb
Taint policy
Taint policy, when a taint is configured on a node, if the Pod does not have a policy to tolerate the taint, the Pod is not allowed to be scheduled to that node
Pod lifecycle: Creating
After the Pod is scheduled, the creation phase begins. kubelet will create the Pod based on the pod.spec expectation state. kubelet will go through the following process in total during the creation phase
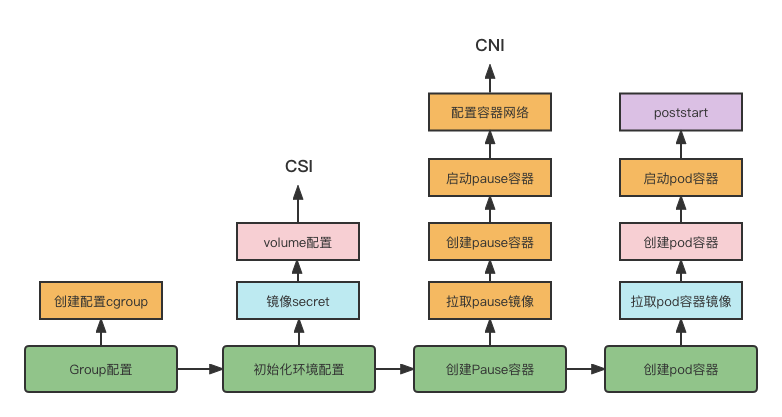
- Group configuration: mainly for the container configuration cgroup, which involves the container resource limits, such as not allowed to exceed the cpu, memory configuration, here involves the Pod’s qos level determination.
- Initialization environment configuration: mainly for the configuration of the relevant Pod data storage directory, involving volume, will refer to the CSI protocol, but also to get the image secret, in order to subsequently pull the image to prepare for work.
- Create pause container: create pause container, the container is mainly for the subsequent configuration of the container network, configuration of the container network will go to call CNI.
- create Pod container: based on imagesecret pull business images, in the creation of Pod container stage, will also be the corresponding Pod YAML configuration transfer in, after starting the Pod container, will be based on poststart for the relevant callbacks.
In the above phase, some key concepts will be selected for detailed explanation.
image
- imagePullSecrets: the key to pull the image, to ensure that it can pull image:testdemo:v1, especially if the image repository is a private one
- imagePullPolicy: image pulling policy
- Always: Always pull images
- IfNotPresent: use local image if available, no pulling
- Never: only use local image, no pulling
containers
Note that containers is used in the plural and can be filled with multiple container images: for example, you can put nginx and business containers. The advantage of this is that you can minimize the number of non-business related code or processes in the business container.
Containers involve a lot of configuration, including basic configuration involving volume, env, dnsconfig, host, etc.
|
|
env: configure the environment variables of the PoddnsConfig: Configure the Pod’s domain name resolutionhostALiases: configure the contents of the /etc/hosts filevolume/volumeMount: configure the file to be mounted to the container, and also configure the file storage system to be mounted to the container
postStart
The current poststart demo is to initiate command commands and can also initiate http requests, the main role can be used as resource deployment and environment preparation.
Pod Lifecycle: Running
During the running phase of a Pod, the Pod is checked for health, and the current kubelet provides three ways to determine this
readiness: check whether the Pod is healthy or notliveness: check whether the Pod is normal or not, if the check fails, restart the containerreadinessGate: provide health verification to third-party components, if the third-party component fails to verify, the Pod is not healthy.
|
|
readiness and liveness check parameters are the same
-
httpGet / tcpSocket: both are checked, one is http request verification, one is tcpSocket, which also has exec execution command, and grpc form verification
-
initialDelaySeconds : how long to delay the start of the check, the reason is that when the container starts, usually need to verify after a while
-
periodSeconds : check the time period
-
failureThreshold : several consecutive failures, it means that the round of inspection failure
-
successThreshold : several consecutive successes, then on behalf of the success of the round of inspection
-
timeoutSeconds : on behalf of the test timeout time, if the test does not return within the configuration time, the test is considered a failure
readiness, liveness although the parameters are not the same, but the results of the test behavior is not consistent.
- readiness default state is false, that is, Pod for unhealthy, until the inspection passed, then the Pod will become healthy
- liveness is true by default, which does not restart the Pod at the beginning, but only after the inspection fails, the container restart operation will be performed
readinessGate is an extension of Pod health, based on which kubelet will configure the corresponding conditions in pod.status.conditions by default, for example, the current example readinessGate is conditionType: TestPodReady , then the corresponding conditions will be conditions.
When the condition.status is false, the Pod will always be unhealthy, even if the readiness check passes, until the third-party system goes to operate the Pod to update the condition.status to true, in order to turn the Pod into a healthy one, so that it can access more Pod health indicators.
Pod lifecycle: Terminating
When the client initiates a request to delete a Pod, it actually configures pod.metadata.deletionTimestamp, and after the kubelet senses it, it starts the Pod recycling process
The whole Pod recycling cycle, in general, is preStop->SIGTERM->SIGKILL
When kubelet does preStop, it starts to launch SIGTERM to the processes in the container, and if it exceeds the total default time of 30S (metadata.DeletionGracePeriodSeconds), it will force to launch SIGKILL to the container, that is, the total time of preStop+SIGTERM is not allowed to exceed 30s.
05 Status
|
|
Based on the above YAML example, the Pod status state is broken out and analyzed:
-
conditions: conditions is used as a more detailed status report, which itself is also an extension mechanism, other extension fields can also be put into it, such as network conditions, where readinessGate is a manifestation of this extension mechanism, but to decide whether a Pod is ready, it only ever depends on type: Ready is true or not
-
containerStatuses : the state of each container in the Pod
-
hostIP : The IP address of the node where the Pod is located
-
phase : The lifecycle state of the Pod
- Pending: represents a Pod with one or more containers that are not yet running, including before the Pod is dispatched to the node and before the image is pulled
- Running: means the Pod is bound to the node and at least one container is running or restarting
- Successed: means all containers in the Pod have been terminated
- Failed: means at least one container in the Pod has failed to terminate
- Unknown: means the Pod status is not available
-
podIP / podIPs: IP address of Pod, if there is ipv4, ipv6, you can configure it on podIPs
-
qosClass: stands for kubernetes service level
- Guaranteed: resource.requests is consistent with resource.limits
- Burstable: resource.requests is inconsistent with resource.limits
- BestEffort: no resource.requests and resource.limits configured
-
startTime : start time
By breaking down the four Pods above, we’ve basically figured out the problem of where a Pod comes from under k8s. The subsequent articles in this series will continue to address the “where to” question: the beauty of Kubernetes is that it is not just about pulling up a workload, but about being able to orchestrate large workloads with ease.