Harbor is a CNCF Foundation-hosted open source trusted cloud-native docker registry project that can be used to store, sign, and scan image content. Harbor extends the docker registry project by adding some common features such as security, identity rights management, etc. In addition, it also supports copying images between registries and provides more advanced security features such as user management, access control, and activity auditing, etc. Support for Helm repository hosting has also been added in the new version.
The core function of Harbor is to add a layer of permission protection to docker registry. To achieve this function, we need to intercept commands such as docker login, pull, push, etc., and perform some permission-related checks before performing the operation. In fact, this series of operations is already supported by docker registry v2. v2 integrates a security authentication feature, which exposes the security authentication to external services and lets them implement it.
Harbor Authentication Principles
We said above that docker registry v2 exposes the security authentication to external services, but how is it exposed? Let’s type docker login https://registry.qikqiak.com on the command line to illustrate the authentication process.
- The docker client receives the docker login command from the user and translates it into a call to the engine api’s RegistryLogin method.
- In the RegistryLogin method, the registry service’s auth method is called via http.
- Since we are using the v2 version of the service here, we call the loginV2 method, which makes a /v2/ interface call that authenticates the request
- At this point the request does not contain token information, the authentication will fail and return a 401 error, and the server address where to request authentication will be returned in the header
- After the registry client receives the above return result, it will go to the returned authentication server for authentication request, and the header of the request sent to the authentication server contains the encrypted user name and password
- The authentication server gets the encrypted user name and password from the header, and then it can combine with the actual authentication system for authentication, such as querying the user authentication information from the database or docking the ldap service for authentication verification.
- After successful authentication, a token will be returned, and the client will take the returned token and send another request to the registry service, this time with the obtained token, and the request will be verified successfully, and the returned status code will be 200.
- The docker client receives a status code of 200, which means the operation is successful, and prints the message Login Succeeded on the console. At this point, the whole login process is complete, and the whole process can be illustrated by the following flowchart.
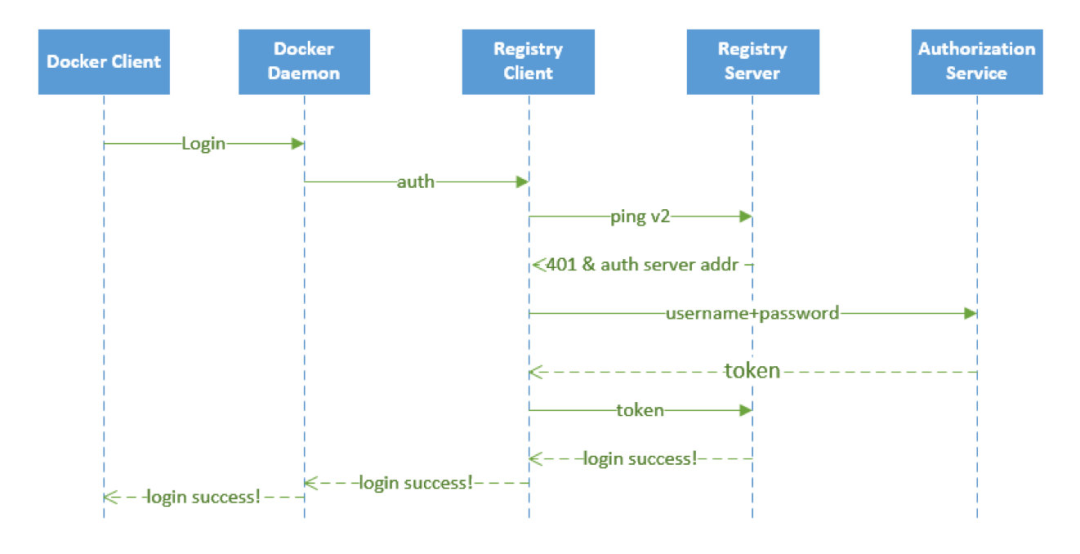
To complete the above login authentication process, there are two key points to note: how to let the registry service know the service authentication address? How can the registry recognize the token generated by the authentication service we provide?
For the first problem, it is relatively easy to solve, registry service itself provides a configuration file, you can start the registry service configuration file to specify on the authentication service address, which has the following paragraph configuration information.
The realm can be used to specify the address of an authentication service, and we can see the contents of this configuration in Harbor below.
For the configuration of the registry, you can refer to the official documentation: https://docs.docker.com/registry/configuration/
The second question is, how can registry recognize the token file we return? If we generate a token according to the registry’s requirements, will the registry be able to recognize it? So we need to generate the token in our authentication server according to the registry’s requirements, not just randomly. So how do we generate it? We can see in the source code of docker registry that the token is implemented by JWT (JSON Web Token), so we can generate a JWT token as required.
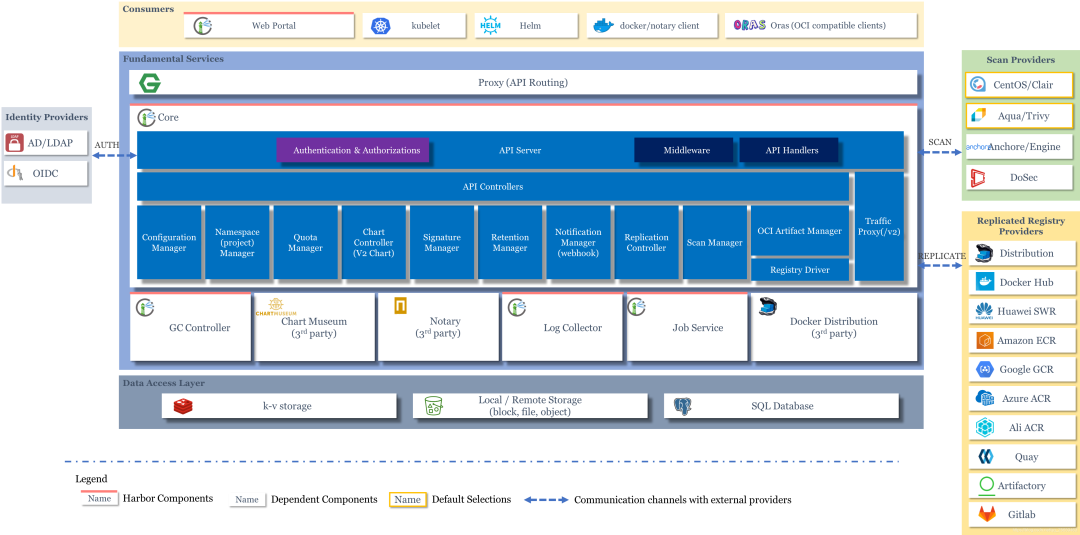
If you are familiar with golang, you can clone Harbor’s code to see it. Harbor uses beego, a web development framework, so the source code is not particularly difficult to read. We can easily see how Harbor implements the authentication service part we explained above.
Installation
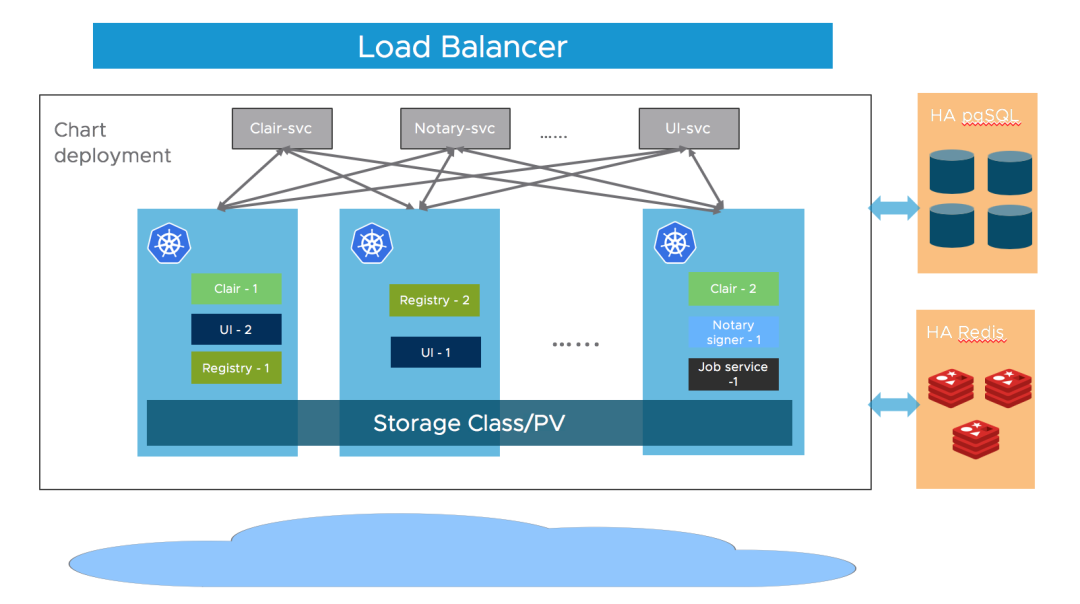
Harbor involves more components, so we can use Helm to install a highly available version of Harbor that also matches the way production environments are deployed. Before installing a highly available version, we need the following prerequisites.
- Kubernetes cluster version 1.10+
- Helm version 2.8.0+
- Highly available Ingress controller
- Highly available PostgreSQL 9.6+ (Harbor does not do database HA deployments)
- Highly available Redis service (not handled by Harbor)
- PVCs that can be shared across nodes or external object stores
Most of Harbor’s components are stateless, so we can simply add copies of Pods to ensure that the components are distributed to as many nodes as possible. In the storage layer, we need to provide our own highly available PostgreSQL and Redis clusters to store application data, as well as PVC or object storage for storage images and Helm Chart.
First add the Chart repository address.
There are many parameters that can be configured when installing Harbor, which can be viewed on the harbor-helm project. During installation we can specify the parameters with -set or edit the Values file directly with values.yaml.
- Ingress configured via
expose.ingress.hosts.coreandexpose.ingress.hosts.notary. - External URL via configuration
externalURL. - External PostgreSQL by configuring
database.typeto beexternaland then supplementing it withdatabase.externalinformation. We need to create 3 empty data manually:Harbor core,Notary serverandNotary signer, Harbor will create the table structure automatically at startup. - External Redis By configuring
redis.typeto beexternaland populating theredis.externalsection, Harbor introducedSentinelmode for redis in version 2.1.0, which you can enable by configuringsentinel_master_setYou can enable it by configuringsentinel_master_set, and the host address can be set to<host_sentinel1>:<port_sentinel1>,<host_sentinel2>:<port_sentinel2>,<host_sentinel3>:<port_sentinel3>. See also the documentation at https://community.pivotal.io/s/article/How-to-setup-HAProxy-and-Redis-Sentinel-for-automatic-failover-between-Redis-Master-and-Slave-servers Configure a HAProxy in front of Redis to expose a single entry point. - Storage, by default, requires a default
StorageClassin the K8S cluster to automatically generate PVs for storing images, charts, and task logs. If you want to specifyStorageClass, you can do so viapersistence.persistentVolumeClaim.registry.storageClass,persistence.persistentVolumeClaim.chartmuseum. storageClassandpersistence.persistentVolumeClaim.jobservice.storageClass. You also need to set the accessMode toReadWriteManyto ensure that PVs can be shared across different nodes. storage across different nodes. We can also specify existing PVCs to store data, which can be configured withexistingClaim. If you don’t have a PVC that can be shared across nodes, you can use external storage to store images and Chart (external storage supported: azure, gcs, s3 swift and oss) and store task logs in the database. Setpersistence.imageChartStorage.typeto the value you want to use and populate the appropriate section and setjobservice.jobLoggertodatabase. - Replicas: by setting
portal.replicas,core.replicas,jobservice.replicas,registry.replicas,chartmuseum.replicas,notary.server.replicasandnotary.signer.replicasto n (n> = 2
For example, here we have harbor.k8s.local as our primary domain, which provides storage through an nfs-client StorageClass, and since we installed GitLab with two separate databases, postgresql and reids, we can also configure Harbor uses these two external databases, which reduces resource usage (we can assume that both databases are in HA mode). But to use the external databases, you need to create the databases manually. For example, if you’re using the GitLab database, go into the Pod and create harbor, notary_server, and notary_signer.
|
|
Once the database has been prepared, it can be installed using our own custom values file, the complete custom values file is shown below.
|
|
This configuration information is overwritten by the default values of Harbor’s Chart package, which we can now install directly.
|
|
Under normal circumstances the installation will be successful in a short interval.
|
|
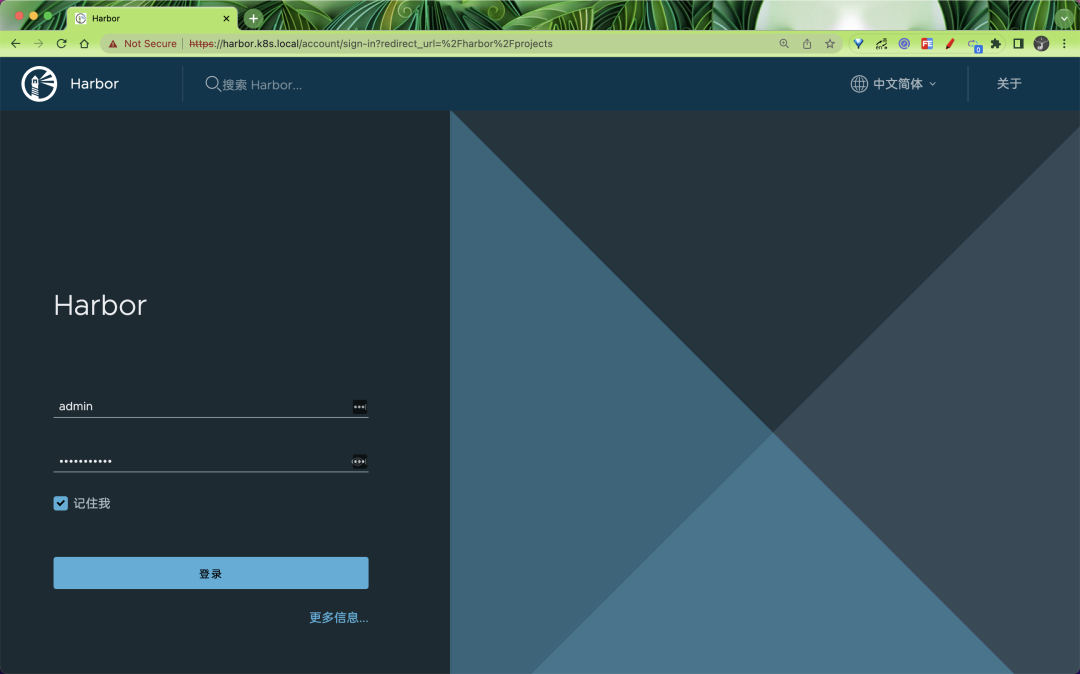
Once the installation is complete, we can resolve the domain name harbor.k8s.local to the Ingress Controller traffic entry point and then access it in the browser via that domain name.
The user name is the default admin, and the password is the default Harbor12345 configured above. It is important to note that you should use https for access (the default will also jump to https), otherwise the login may prompt a username or password error.
Once you have logged in, you can access Harbor’s Dashboard page.
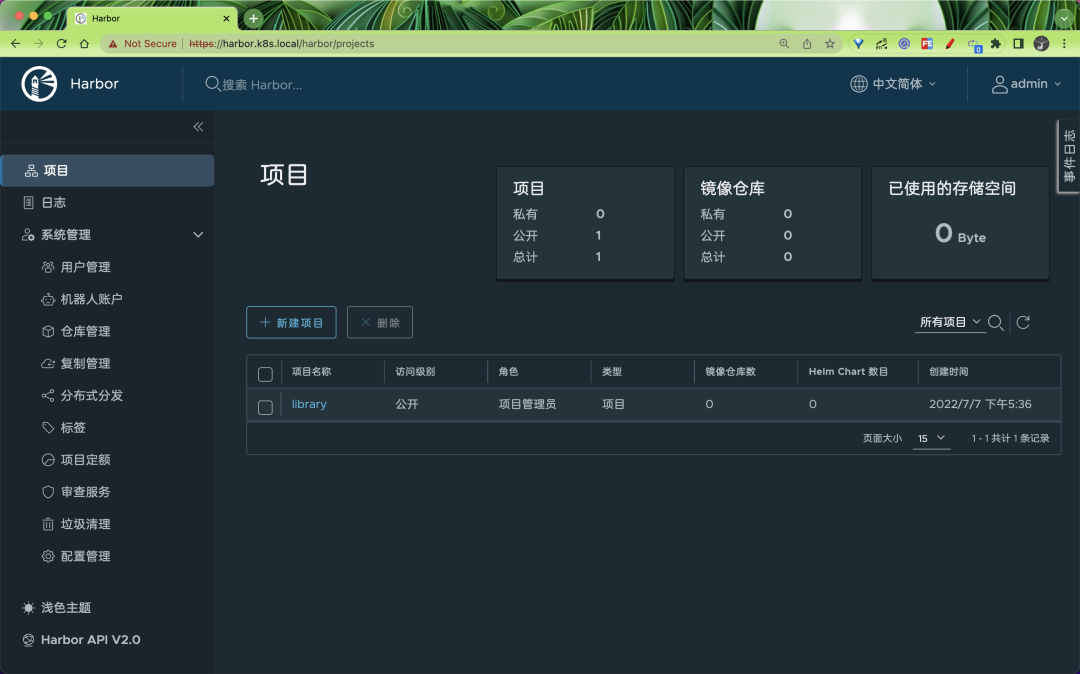
We can see that there are many functions, by default there will be a project named library, which is publicly accessible by default, and you can see that there is also Helm Chart package management inside the project, you can upload it manually here, and you can also do some other configurations for the images inside the project.
Push images
Next, let’s test how to use the Harbor image repository in containerd.
First we need to configure the private image repository into containerd by modifying the containerd configuration file /etc/containerd/config.toml.
|
|
Add the configuration information corresponding to harbor.k8s.local under plugins. "io.containerd.grpc.v1.cri".registry.configs, insecure_skip_verify = true to skip the security checks, and then pass plugins."io.containerd.grpc.v1.cri".registry.configs."harbor.k8s.local".auth to configure the username and password for the Harbor image repository.
Restart containerd after the configuration is complete.
|
|
Now we use nerdctl to log in.
|
|
You can see that it still reports certificate related errors, just add a --insecure-registry parameter to solve the problem.
|
|
Then we start by pulling a random image.
|
|
Then retag the image to the address of the image on Harbor.
|
|
Then execute the push command to push the image to Harbor.
|
|
Once the push is complete, we can see the information about this image on the Portal page.
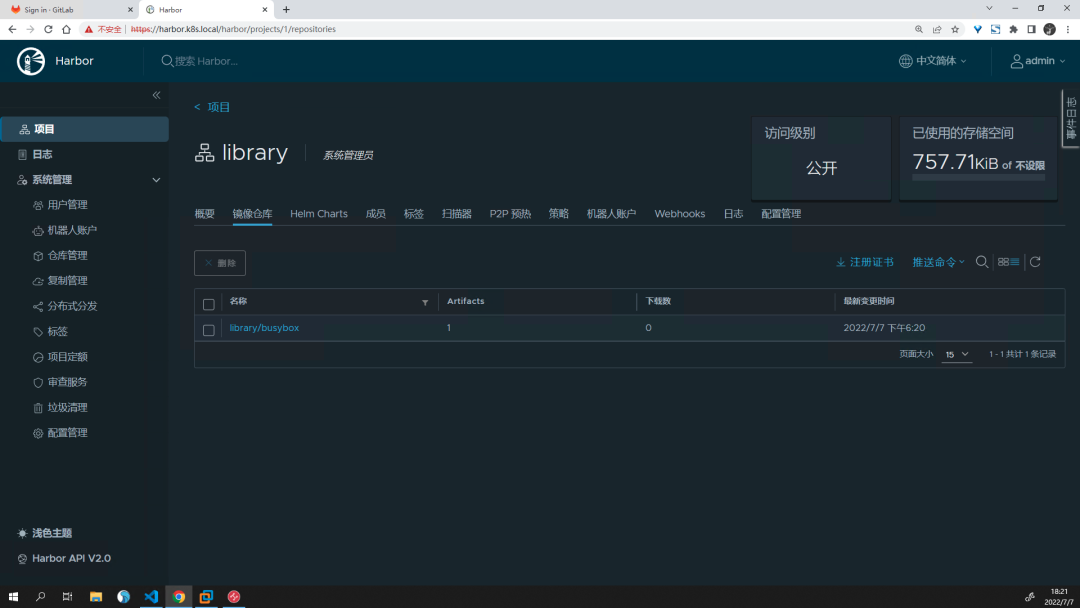
The image push succeeds, and you can also test the pull.
|
|
But above we can also see that using containerd alone, for example accessing the Harbor image repository via nerdctl or ctr commands will result in a certificate error even if you skip the certificate checksum or configure a CA certificate, so we need to skip the certificate checksum or specify a certificate path to do so.
However, if you use ctrctl directly, it is valid.
If you want to use it in Kubernetes then you need to add Harbor authentication information to the cluster in the form of a Secret.
|
|
Then we use the private image repository above to create a Pod.
Once created, you can see if the Pod is getting images properly.
|
|
Here proves that our private image repository is successfully built, you can try to create a private project, and then create a new user, use this user to pull/push the image, Harbor also has some other features, such as image replication, Helm Chart package hosting, etc., you can test yourself, feel the difference between Harbor and the official registry repository comes with.