This article is based on reading the source code of Kubernetes v1.16 and describes the workflow of Deployment Controller through flowcharts, but also contains related code for reference.
In the previous article, “How Kubernetes Controller Manager Works”, we explained how the Controller Manager manages the Controller, and we know that the Controller only needs to implement the event handler and does not need to care about the upper logic. This article is based on that article and describes what the Deployment Controller does when it receives an event from the Informer.
Deployment and controller model
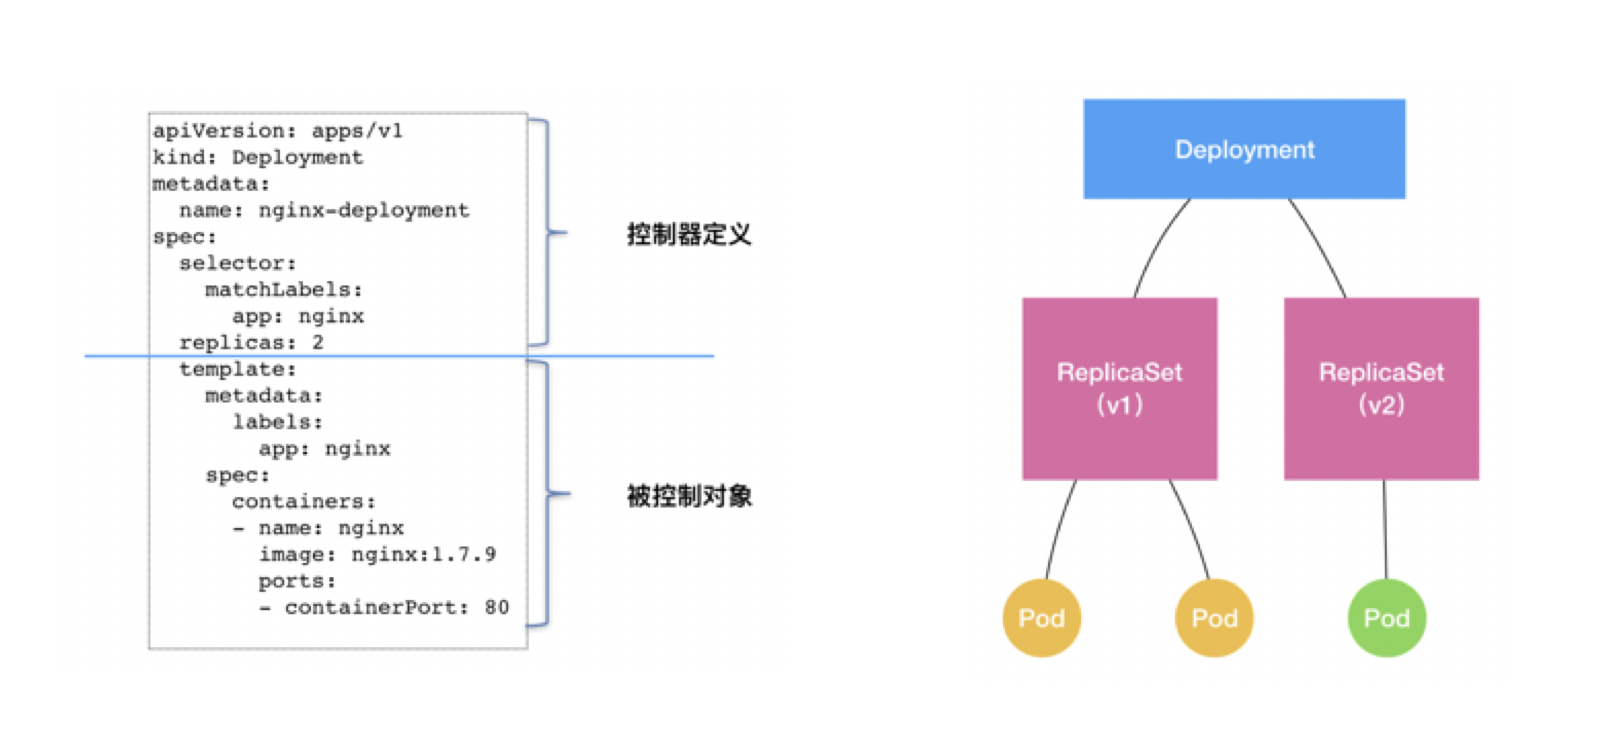
In K8s, pods are the smallest resource unit, and the replica management of pods is implemented through ReplicaSet(RS); deployment is actually based on RS to do higher-level work.

This is the controller model of Kubernetes, where top-level resources extend new capabilities by controlling lower-level resources. deployment does not manage pods directly, but rather controls the replicas of pods by managing rs. deployment implements versioning by controlling rs: each release corresponds to a version, each version has an rs Deployment only needs to ensure that the state of rs is expected in all cases, and rs ensures that the state of the pod is expected in all cases.
How K8s manages Deployment
With an understanding of where deployment fits into K8s, let’s look at how this resource achieves its desired state.
Kubernetes APIs and controllers are based on horizontal triggering, which facilitates self-healing and periodic orchestration of the system.
The concept of horizontal triggering comes from hardware interrupts, which can be triggered either horizontally or edge-triggered.
- Horizontal triggering : The system depends only on the current state. Even if the system misses an event (maybe it hangs due to a fault), when it recovers, it can still respond correctly by looking at the current state of the signal.
- Edge triggering : The system depends not only on the current state, but also on the past state. If the system misses an event (“edge”), it must look at that event again to recover the system.
The Kubernetes horizontal triggering API is implemented in such a way that the controller monitors the actual state of the resource object, compares it to the desired state of the object, and then adjusts the actual state to match the desired state.
The horizontally triggered API is also called the declarative API, and the controller that monitors the deployment resource object and determines that it meets expectations is the deployment controller, and the corresponding controller for rs is the rs controller.
Deployment Controller
Architecture
First look at the definition of DeploymentController in K8s.
|
|
There are several main components.
rsControlis aReplicaSet Controllertool for claiming and discarding rs.clientis the client that communicates with the APIServer.eventRecorderis used to record events.syncHandleris used to handle the synchronization of the deployment.enqueueDeploymentis a method that puts the deployment into a queue.dLister,rsLister, andpodListerare methods for fetching resources from theshared informer store, respectively.dListerSynced,rsListerSynced, andpodListerSyncedare used to identify whether or not a resource has been synchronized in theshared informer store, respectively.- The
queueis the workqueue. When the deployment, replicaSet, and pod change, the corresponding deployment will be pushed into this queue, and thesyncHandler()method will handle the deployment from the workqueue uniformly.
Workflow
Next, look at the workflow of the deployment controller.

The deployment controller takes advantage of the informer’s ability to listen to resources and work with other controllers. There are three shared informers – deployment informer, rs informer, and pod informer.
First, the deployment controller registers hook functions with the three shared informers, and the three hook functions will push the relevant deployment into the workqueue when the corresponding event comes.
When the deployment controller starts, a worker controls the syncHandler function to push out the items in the workqueue in real time and perform tasks based on the items. The main tasks include: adopting and discarding rs, distributing events to eventRecorder, and deciding how to handle subordinate resources based on the escalation policy.
workqueue
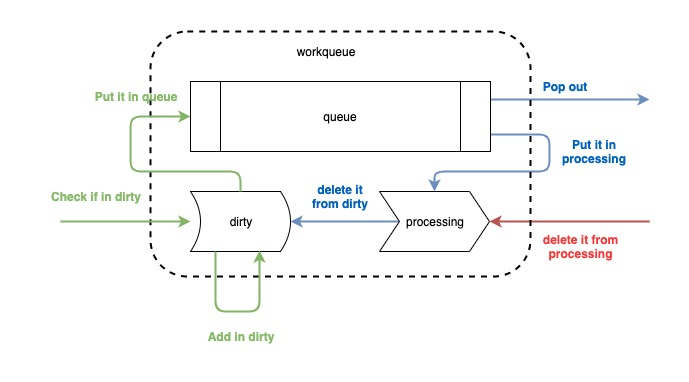
First of all, let’s take a look at workqueue, which is actually a queue used to assist informer in distributing events. The whole process can be sorted out in the following diagram.

As you can see, the workqueue is divided into three parts, one is a first-in-first-out queue, which is implemented by slicing, and two are maps called dirty and processing. the whole workflow is divided into three actions, add, get, and done.
add is to push the message into the queue. The message comes from the informer, in fact, the message is not the whole event, but the resource key, that is, namespace/name, in this form to inform the business logic that a resource change event has come, you need to take this key to get the specific resources in the indexer. As the process shown in green above, after the message is carried out, first check whether it exists in dirty, if it already exists, do not do any processing, indicating that the event is already in the queue, do not need to repeat the process; if it does not exist in dirty, the key will be stored in dirty (as the key of the map, the value of the empty structure), and then pushed into the queue a copy.
get is the process of getting the key from the queue by the handle function. When the key is popped out of the queue, it is put into processing and its index in dirty is removed. The reason for this step is that putting the item in processing marks it as being processed, and removing it from dirty does not affect the events that will be added to the queue later.
done is the step the handle must perform after processing the key, which is equivalent to sending an ack to the workqueue that I have finished processing and the action will just remove it from the processing.
With this small and beautiful first-in-first-out queue, we can avoid duplicate fetching of resources from the indexer when multiple events occur. Let’s go through the deployment controller process.
The adoption and abandonment process of replicaSet
In the workflow of deployment controller, you can notice that in addition to the three hook functions of deployment, there are also hook functions of rs and pods. Among the three hook functions of rs, the process of adoption and abandonment of rs by deployment is involved.
rs adoption
First, let’s look at the adoption process of rs.

In all three hook functions of rs, the process of recognition is involved.
When listening to the change of rs, it will find the corresponding deployment into the queue according to the ownerReferences field of the rs; if the field is empty, it means it is an orphan rs and starts the rs recognition mechanism.
The first step is to iterate through all the deployments, determine whether the selector of the deployment matches the labels of the current rs, and find all the deployments that match it.
Then determine how many deployments there are in total, if there are 0, return directly, no one is willing to adopt, do nothing, the adoption process is finished; if there are more than 1, throw the error out, because this is abnormal behavior, do not allow multiple deployments to have the same rs at the same time; if there is and only one deployment matches, then find the deployment that is willing to adopt, put it into queue.
The adoption process of addReplicaSet() and updateReplicaSet() is similar, so only the code of addReplicaSet() is shown here.
|
|
deployment adoption and abandonment
The process of adoption and abandonment of rs by a deployment is the process of processing items from the workqueue and finding all rs owned by the current deployment.
This process will poll all rs, and if there is an owner and it is the current deployment, then determine whether the label satisfies the deployment’s selector, and include the result if it does; if it does not, start the abandonment mechanism, and just delete the ownerReferences of the rs, making it an orphan and do nothing else. This is the reason why there is one more rs with replicas!=0 after the deployment selector is modified.
If rs has no owner and is an orphan, determine whether the label satisfies the deployment’s selector, and if it does, start the adoption mechanism, set its ownerReferences to the current deployment, and then include the result.
The following is the source code of the whole process.
|
|
Functions of adoption and abandonment.
|
|
rolloutRecreate
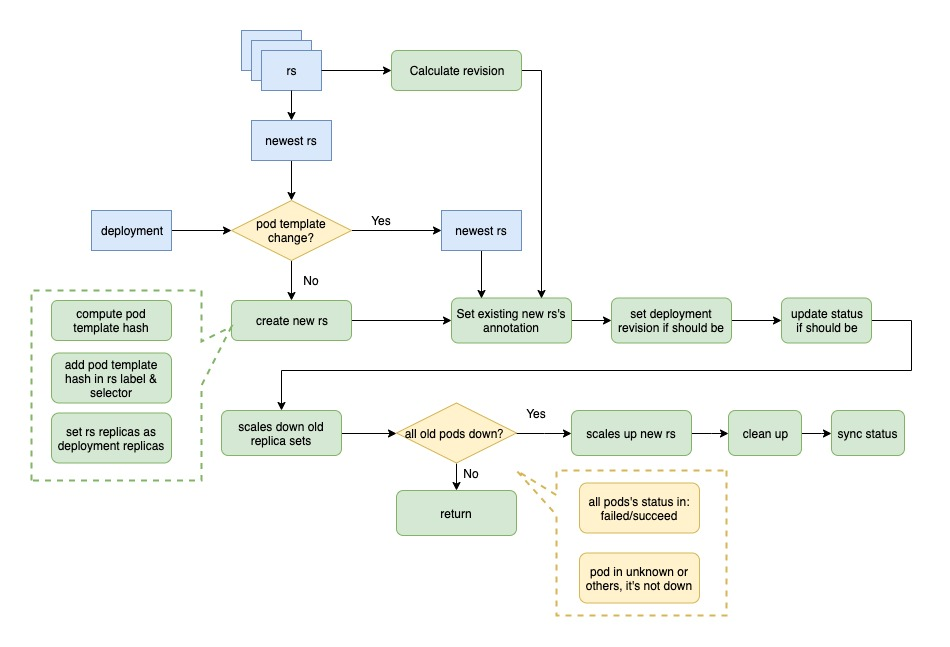
If the deployment’s update policy is Recreate, the process is to delete the old pod and start a new one, as follows.

First, according to the adoption and abandonment process of rs in the previous step, get all the rs of the current deployment, sort them to find the latest rs, compare their pod template with the pod template of the deployment, and create new rs if they do not match.
The process of creating new rs is: calculate the hash value of the pod template of the current deployment and add it to the rs label and selector.
Calculate the maximum revision of all the old rs, add it by one and use it as the revision of the new rs, and set the following annotation for the new rs.
set the revision of the current deployment to the latest if it is not up to date, and update its status if it needs to be updated.
Downgrade the old rs, i.e. set the number of copies to 0.
Determine whether all the old pods are currently stopped. The condition is that the pod state is failed or succeed, unknown or all other states are not stopped; if not all the pods are stopped, exit this operation and process again in the next loop.
If all pods are stopped, upgrade the new rs, i.e., set its copy number to the number of copies of the deployment.
Finally, cleanup work is done, such as deleting excess rs when the number of old rs is too high.
Here is the source code of rolloutRecreate.
|
|
rolloutRolling
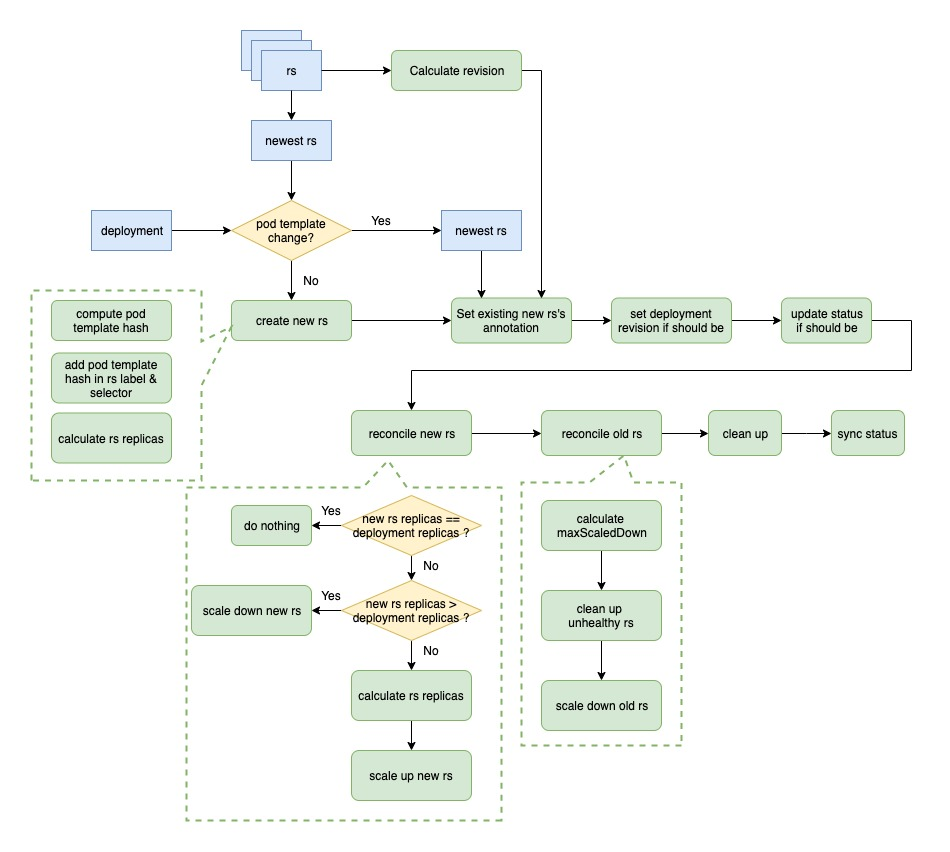
If the update policy of the deployment is Recreate, the process is to delete the old pod and start a new one as follows.

As you can see from the above diagram, the process from start to creation of new rs is the same as the rolloutRecreate process, the only difference is the process of setting the number of copies of new rs. In the rolloutRolling process, the number of copies of the new rs is deploy.replicas + maxSurge - currentPodCount. The code is as follows.
|
|
Then it comes to the process of increasing and decreasing the number of copies of old and new rs. The process of scale up new rs is the same as above; the process of scale down old rs is to calculate a maximum number of scale down copies first, and if it is less than 0, no operation is done; then an optimization is done in the time of scale down, first scale down unhealthy rs; finally, if there is still a balance, then scale down normal rs. This ensures that the unhealthy copies are removed first; finally, if there is still a balance, the normal rs are scaled down again.
The number of copies for each scale down is allAvailablePodCount - minAvailable, i.e. allAvailablePodCount - (deploy.replicas - maxUnavailable). The code is as follows.
|
|
Summary
Because Kubernetes uses a declarative API, all a Controller does is calculate an expected state based on current events, determine whether the actual state meets the expected state, and if not, take action to bring it closer.
In this article, we analyze the workflow of Deployment Controller, and although it is tedious, what it does is centered around the goal of “converging to the expected”.
I hope these two articles have given you a glimpse into the general workflow and implementation of Kubernetes Controller Manager.