1. Introduction
OverScroller in Android is responsible for calculating the real-time sliding position for ListView, RecyclerView, ScrollView and other scrolling controls, and these position algorithms directly affect the experience of each scroll.
As we all know, Android’s animation experience is ~far~ inferior to iOS, and even now that Android generally supports 120Hz high swipe, the experience is not very comfortable. The reason for this is no longer hardware performance limitations, but the design of many of these animations is inherently problematic. Apple released Designing Fluid Interfaces a long time ago to create a silky smooth user experience, on the contrary, Android, for a daily use of the most used swipe tool class Odel The most used sliding tool class on Android, OverScroller, has seen very few improvements in recent years, almost none, which is really something I want to spit out.
This series is divided into two articles, the first one is about the usage and principle of OverScroller, the core tool class for Android scrolling, and the second one will explore how to improve it, hoping that each exploration will bring improvement to the user experience.
2. Introduction to use
Before we use it, let’s see what OverScroller can do.
- startScroll: Scrolls a specified distance from a specified position and then stops, the scrolling effect is related to the set scroll distance, scroll time, interpolator, not related to the off-hand speed. Generally used to control the View scrolling to the specified position.
- fling: slide a position from the specified position and then stop, the scrolling effect is only related to the off-hand speed and sliding boundary, not set the scrolling distance, scrolling time and interpolator. Generally used to continue to let the View slide for a while after touching the raised hand.
- springBack: spring back from the specified position to the specified position, generally used to achieve the spring back effect after dragging, can not specify the spring back time and interpolator.
| startScroll | fling | springBack |
|---|---|---|
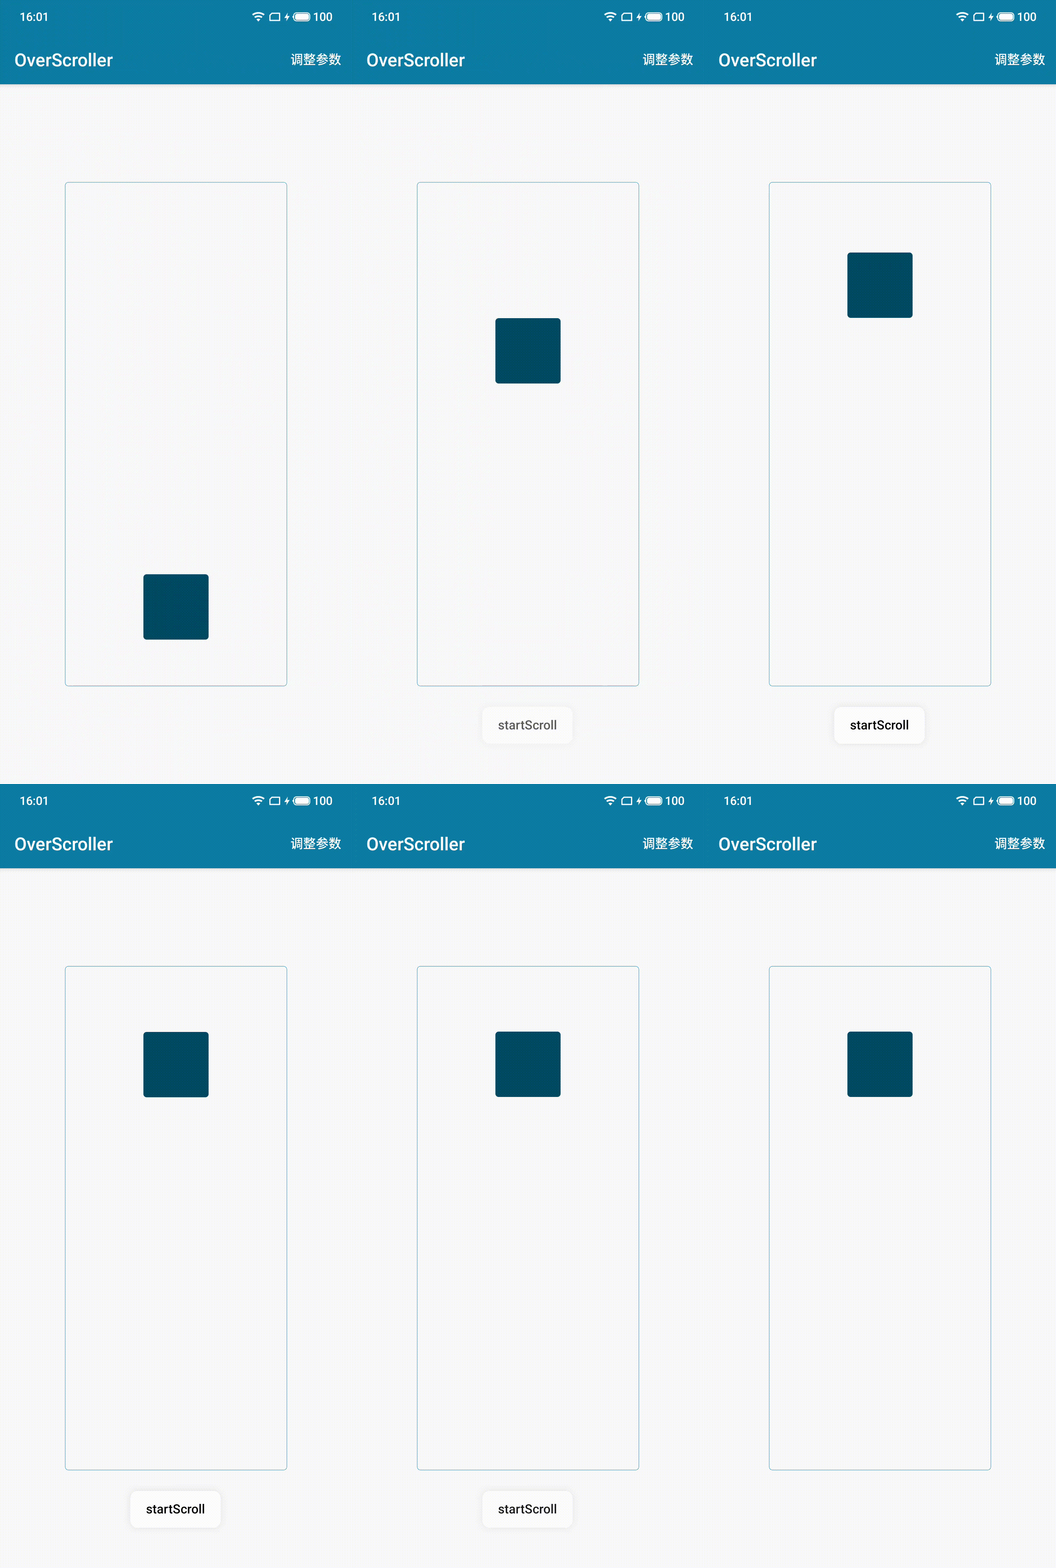 |
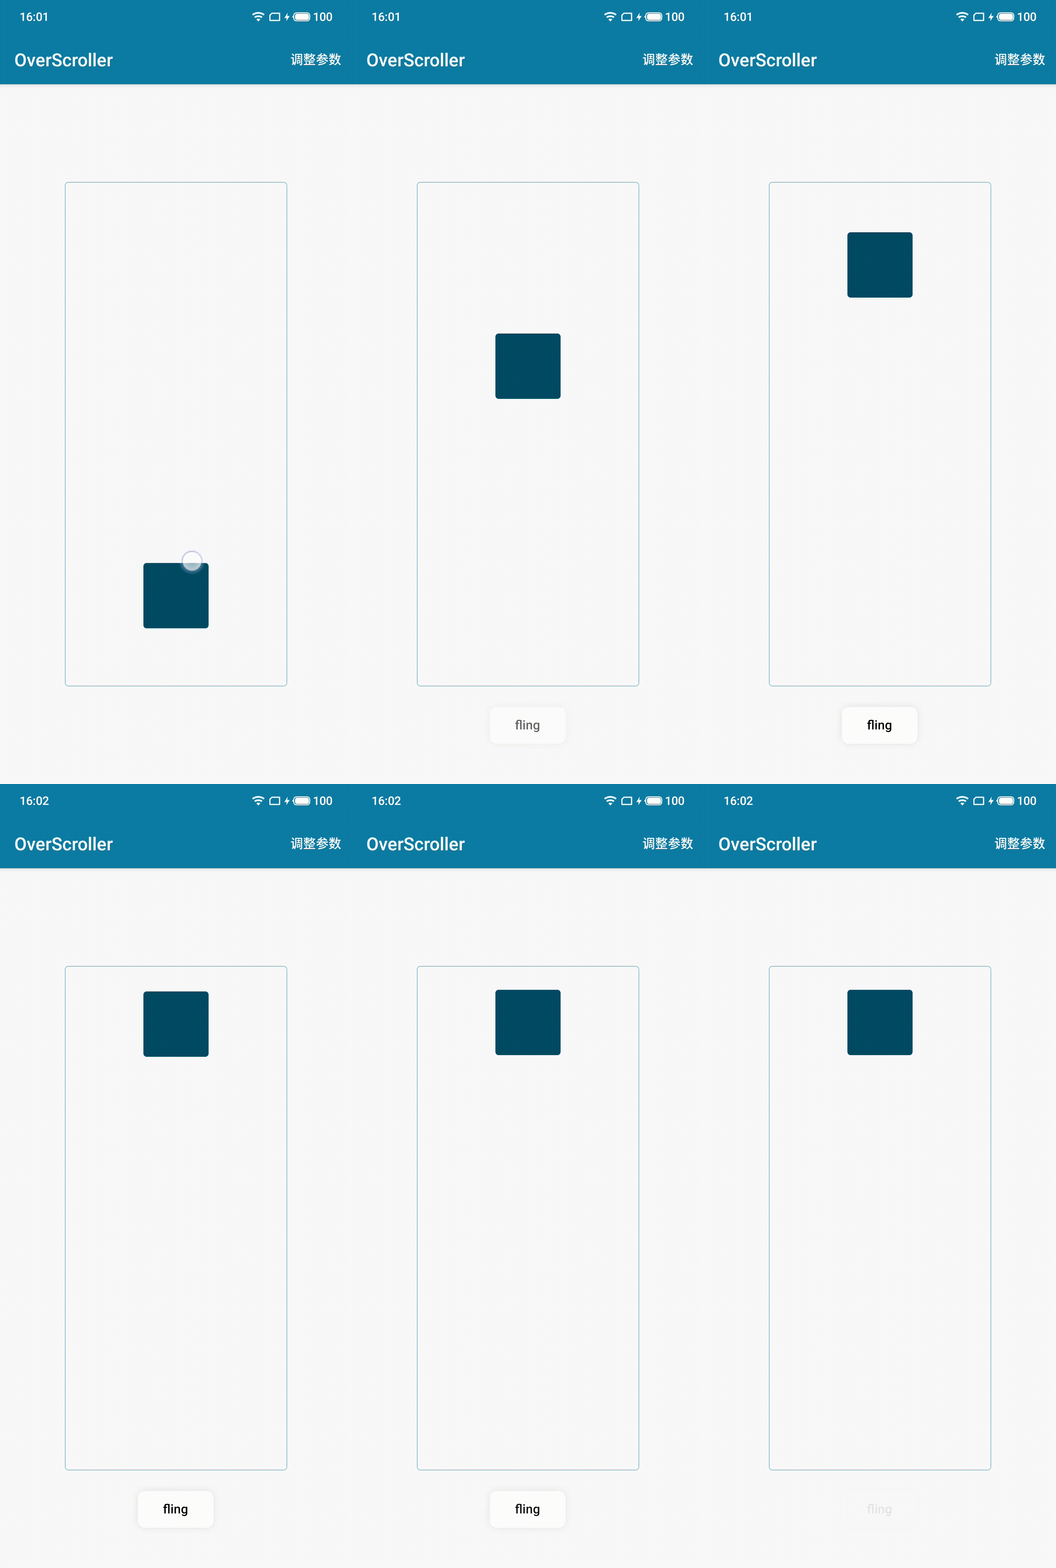 |
 |
It is also simple to use in code.
|
|
The above is the minimal logic to start a constantly scrolling and refreshing View (of course a more engineering approach could also put the Runnable logic in View#computeScroll and trigger it via invalidate). fling and springBack are started in the same way, so we won’t go into details here.
3. Deep inside the OverScroller
As you can see in the above code, after starting a scrolling task, the position is computed by calling computeScrollOffset again and again, so let’s look at the code implementation
3.1 startScroll
|
|
The logic of startScroll is very simple, it just marks the start position, end position, start time and animation duration according to the parameters, it doesn’t involve the position calculation (because the position calculation is placed in the computeScrollOffset).
And look at the logic of computeScrollOffset called at regular intervals.
|
|
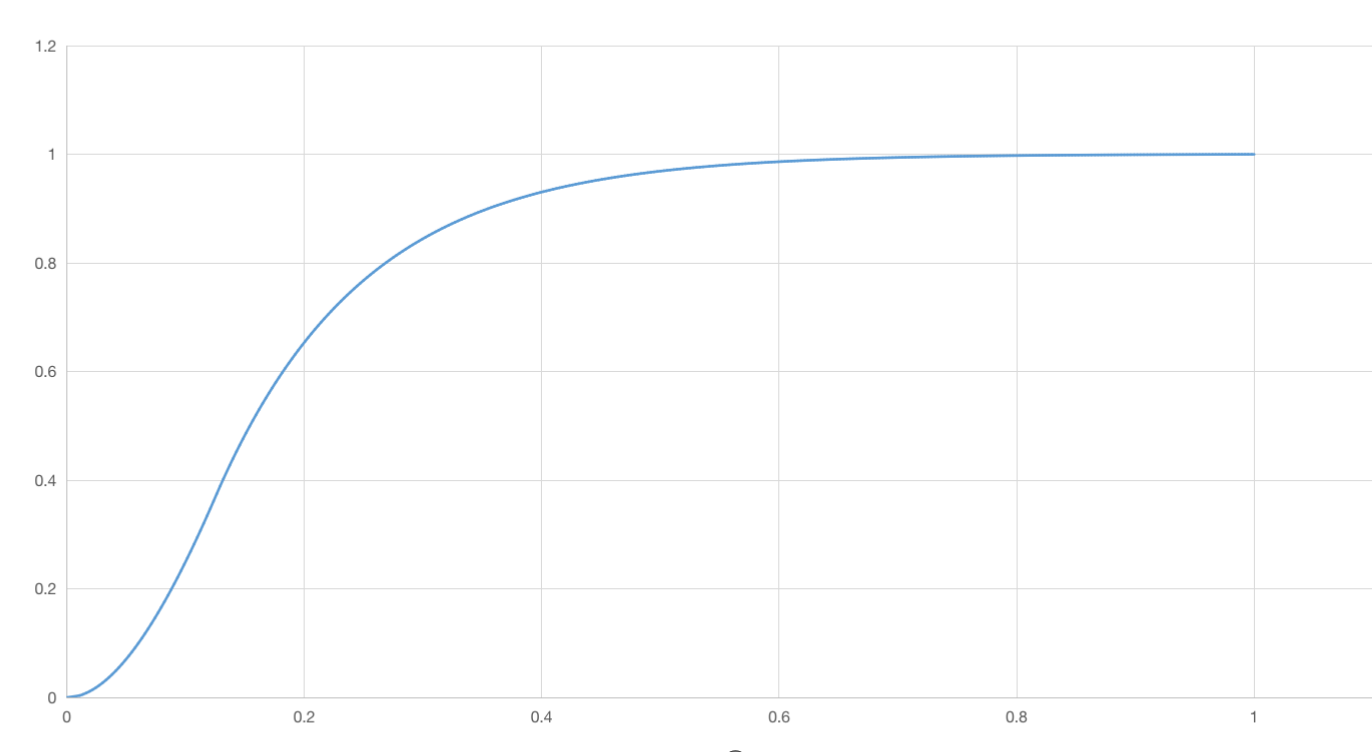
Logic is also very simple, there is really not much to say …… is to map the interpolator curve to the displacement curve, the duration if not specified, the default is 250ms, the interpolator needs to be passed through the construction method, if not specified, the system will specify a ViscousFluidInterpolator by default, the following is the curve of this interpolator, you can see is a first slow then fast then slow animation.
3.2 fling & springBack
Why do fling and springBack need to be mentioned together? Because the animation of fling is more complex, and springBack is sort of a sub-state of fling, consider the following case.
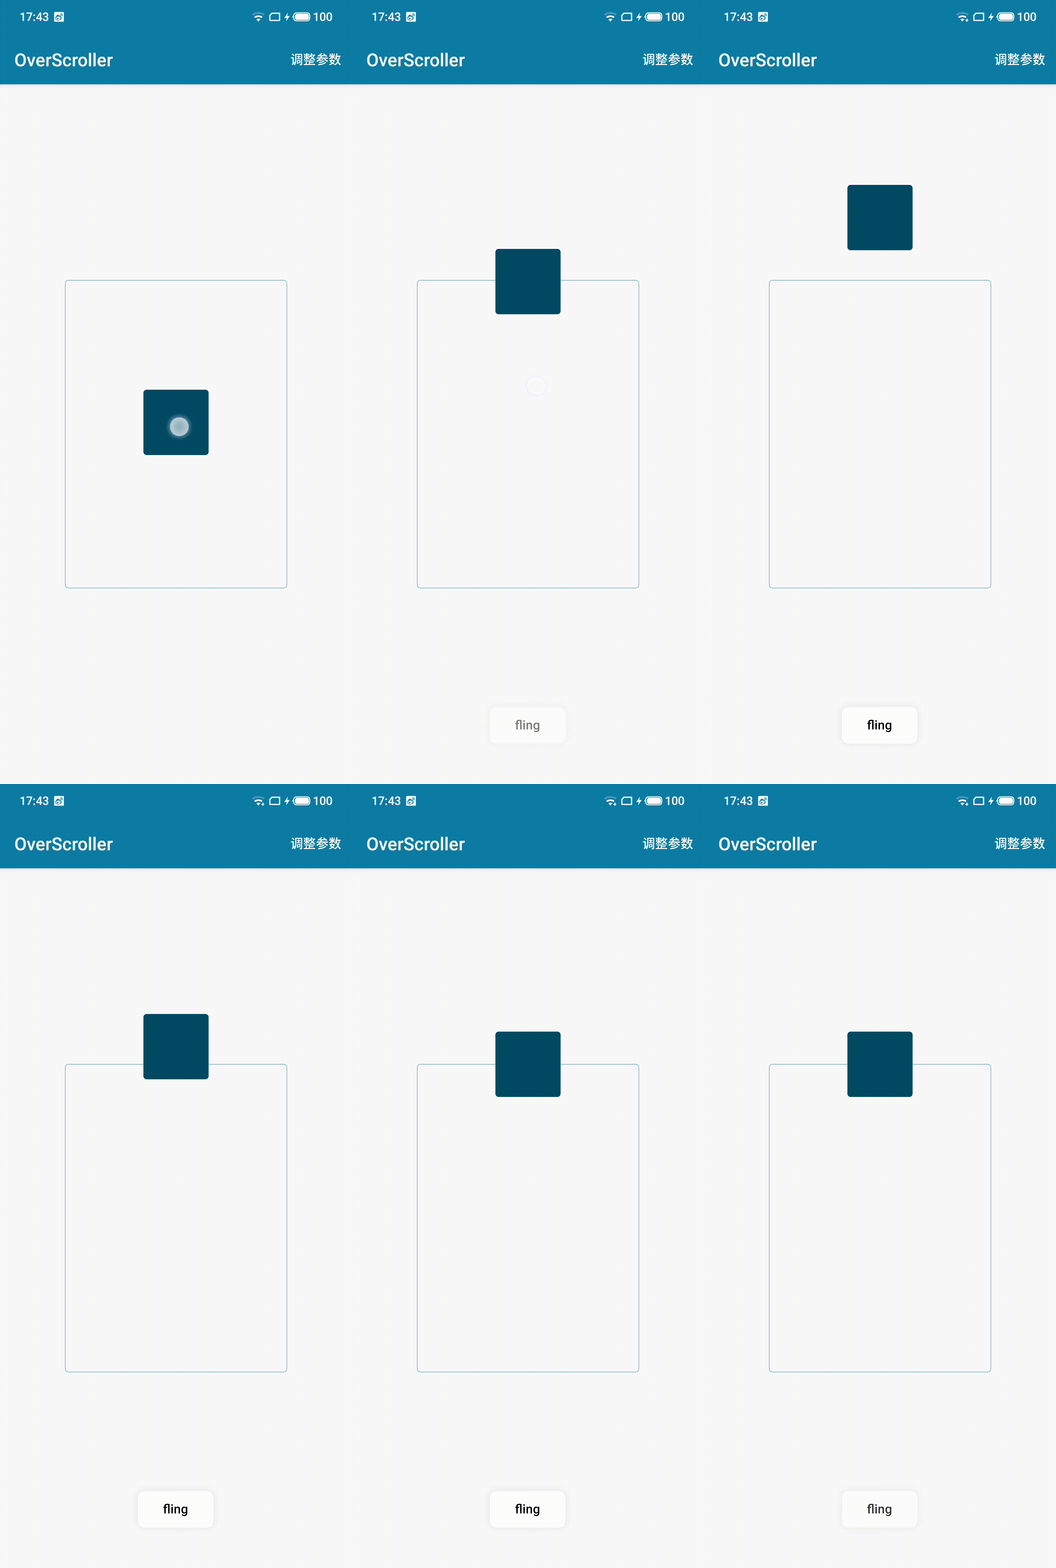
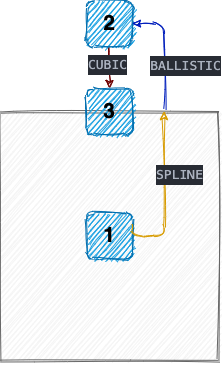
We see that when fling is executed at a relatively large speed, it is very easy to hit the boundary, and fling will execute the boundary crossing and bounce back according to the preset boundary value, which can decompose the whole animation process into three stages.
- SPLINE: that is, the normal sliding stage
- BALLISTIC: The deceleration phase of boundary crossing
- CUBIC: the rebound phase
The animation executed after springBack is actually the CUBIC phase of fling, so we simply put it together.
The naming is actually quite interesting, these three are sample curve, ballistic curve, and three times curve, from the naming, we can roughly infer that the “time-position” curves used in the three phases are different.
Of course, a lot of Android controls will cancel the boundary rebound effect when flinging, and display an EdgeEffect instead. In other words, after executing the SPLINE stage animation, you can’t see BALLISTIC and CUBIC, you can only see an edge glow effect, and when the list reaches the top/bottom, it often stops there at once~.
3.2.1 SPLINE
First, let’s look at the entry function that starts fling.
|
|
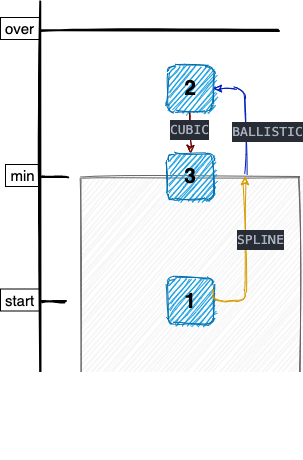
Before looking at the code, let’s take a look at the above diagram, which illustrates the meaning of start, min, max, over, etc. Here is a brief explanation
- The final stopping position after flinging must be between min and max
- The BALLISTIC crossing phase cannot exceed the over position, i.e., over is the maximum crossing distance.
- start can be located outside the [min, max] interval, if it is outside the interval, a decision will be made based on the direction and size of the velocity, there will be three cases as follows.
- velocity pointing out of bounds: execute BALLISTIC to cross the bounds first and then execute CUBIC to bounce back to the bounds
- Velocity pointing inside the boundary: If the velocity is enough to cross the boundary, the normal process will be executed, and SPLINE will be executed first.
- Speed pointing inside the boundary: if the speed is not enough to cross the boundary, execute CUBIC directly back to the boundary
The main functions of the fling function are
- Calculate the duration and distance of the slide based on the starting speed.
- If the final point is outside the [min, max] interval, recalculate the time to reach the boundary.
- Mark the current state as SPLINE state
The equations for the sliding distance and duration can be calculated by considering mPhysicalCoeff as a constant as well, listing the time-velocity equation and the image.
$$y=1000\cdot \exp \left( \frac{\ln \left( \frac{0.35x}{2140.47} \right)}{1.358} \right)$$
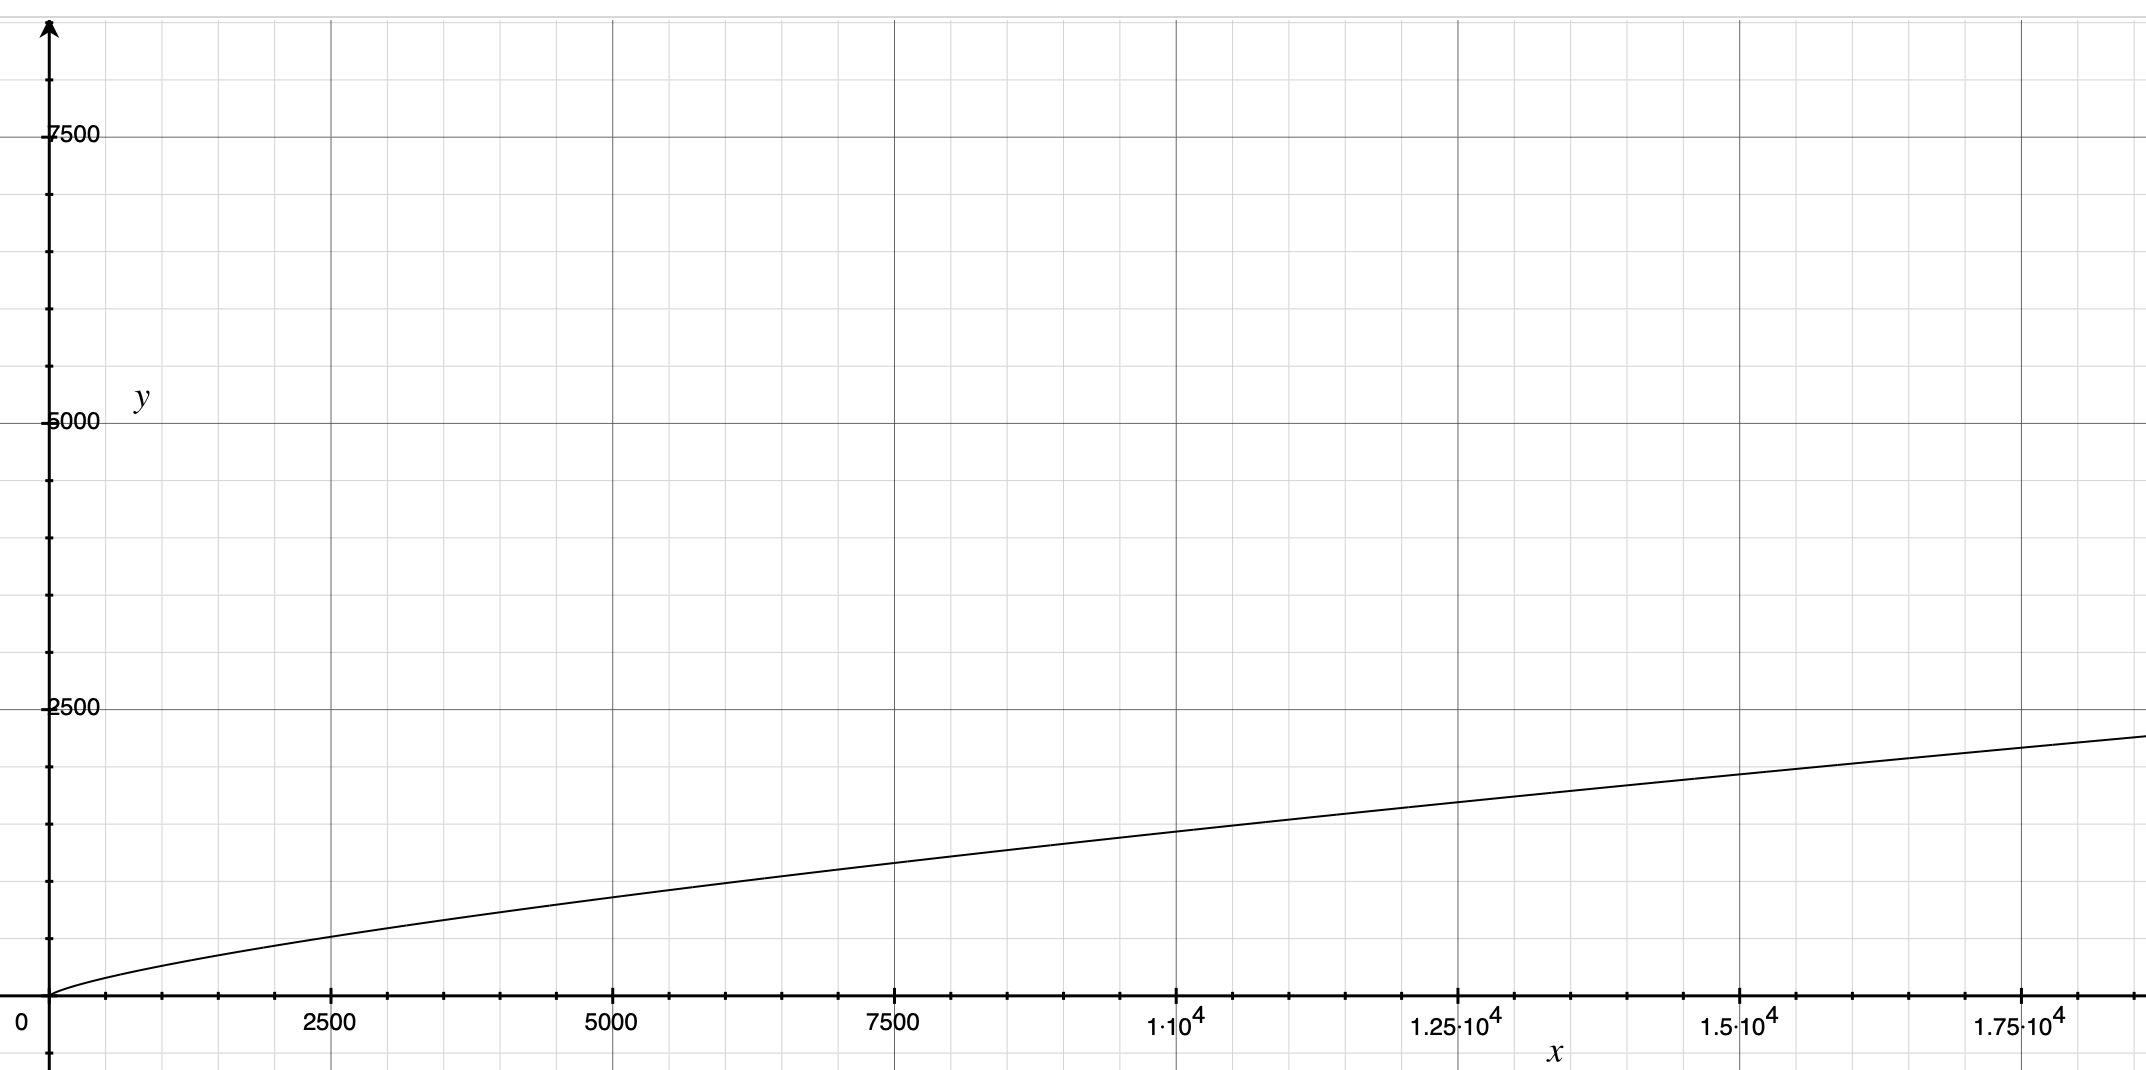
Look again at the distance-velocity equation.
$$y=2140.47\cdot \exp \left( 1.74\cdot \ln \left( \frac{0.35\cdot x}{2140.47} \right) \right)$$
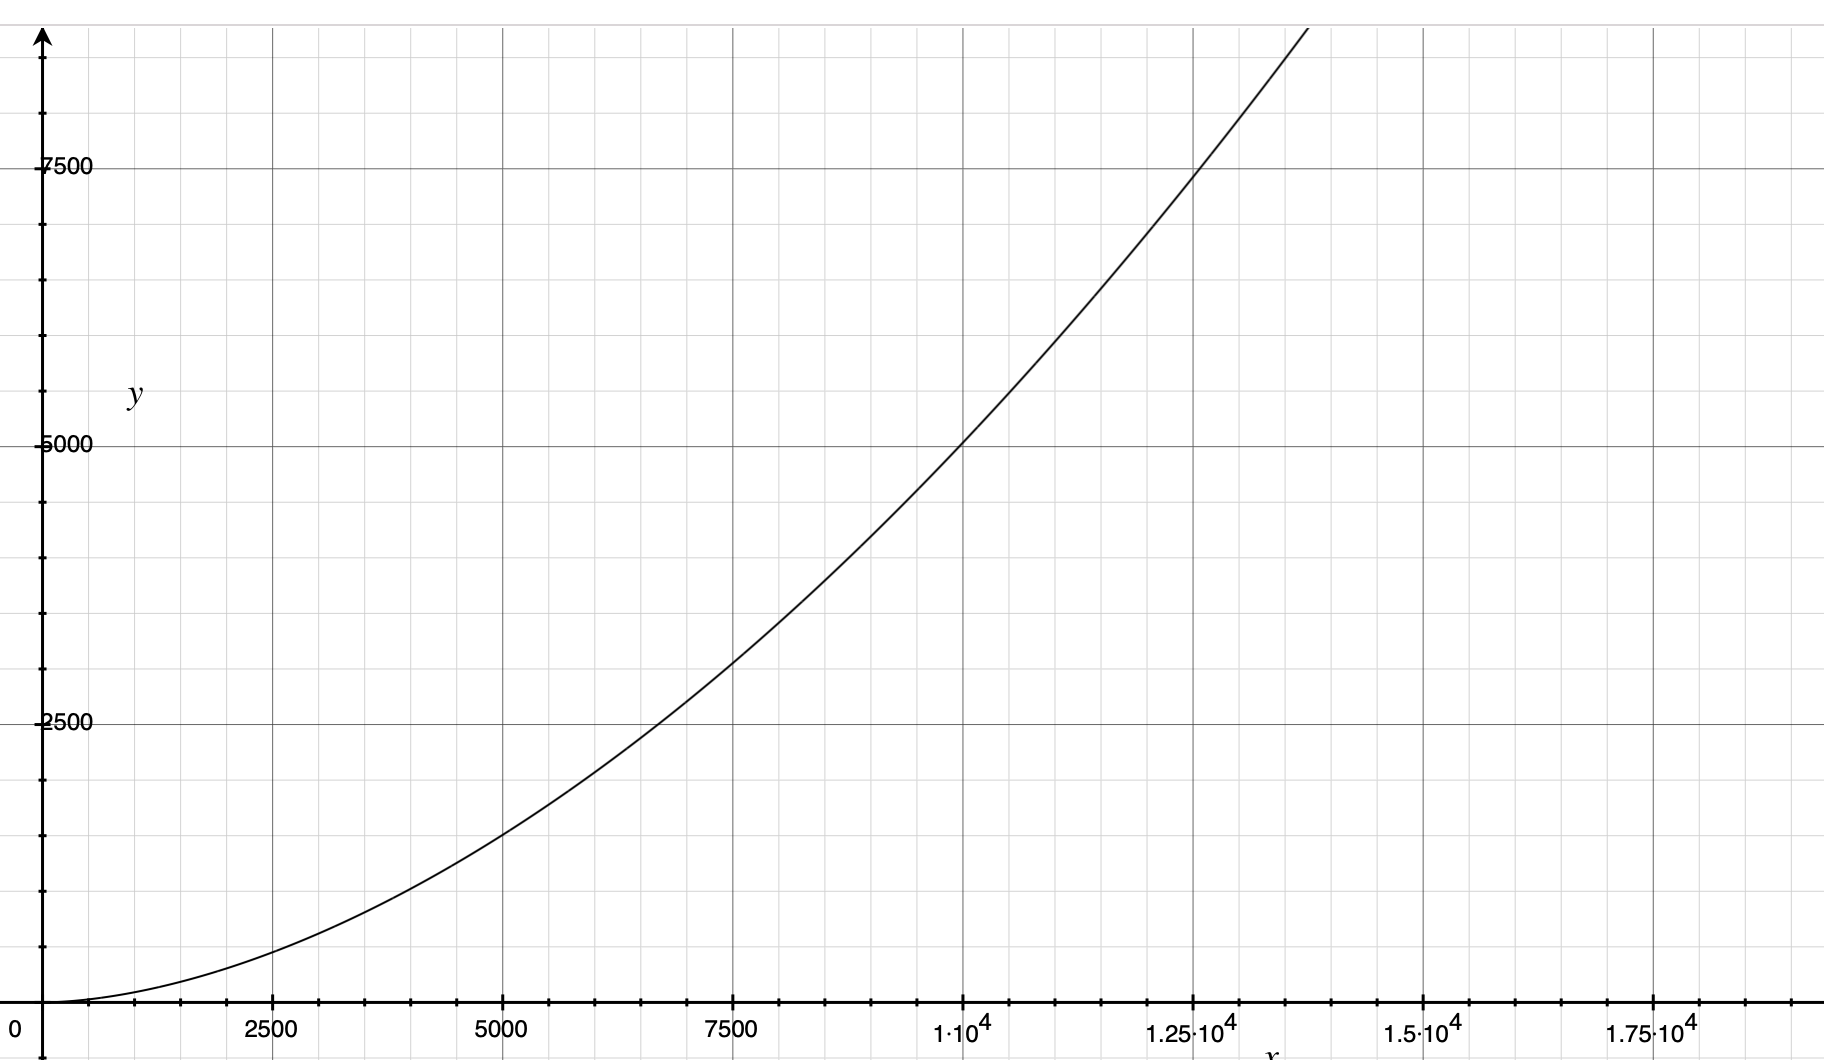
As you can see, both distance and duration increase with speed, but the growth rate of duration converges at a later stage to ensure that the animation duration is not too long.
Another point to note is that the ratio of $ \frac{Distance} {Duration} $ is a linear function, that is, the larger the initial velocity, the larger the average velocity, and the two are growing linearly.
$$y=\frac{2140.47\cdot \exp \left( 1.74\cdot \ln \left( \frac{0.35\cdot x}{2140.47} \right) \right)}{1000\cdot \exp \left( \frac{\ln \left( \frac{0.35x}{2140.47} \right)}{1.358} \right)}$$
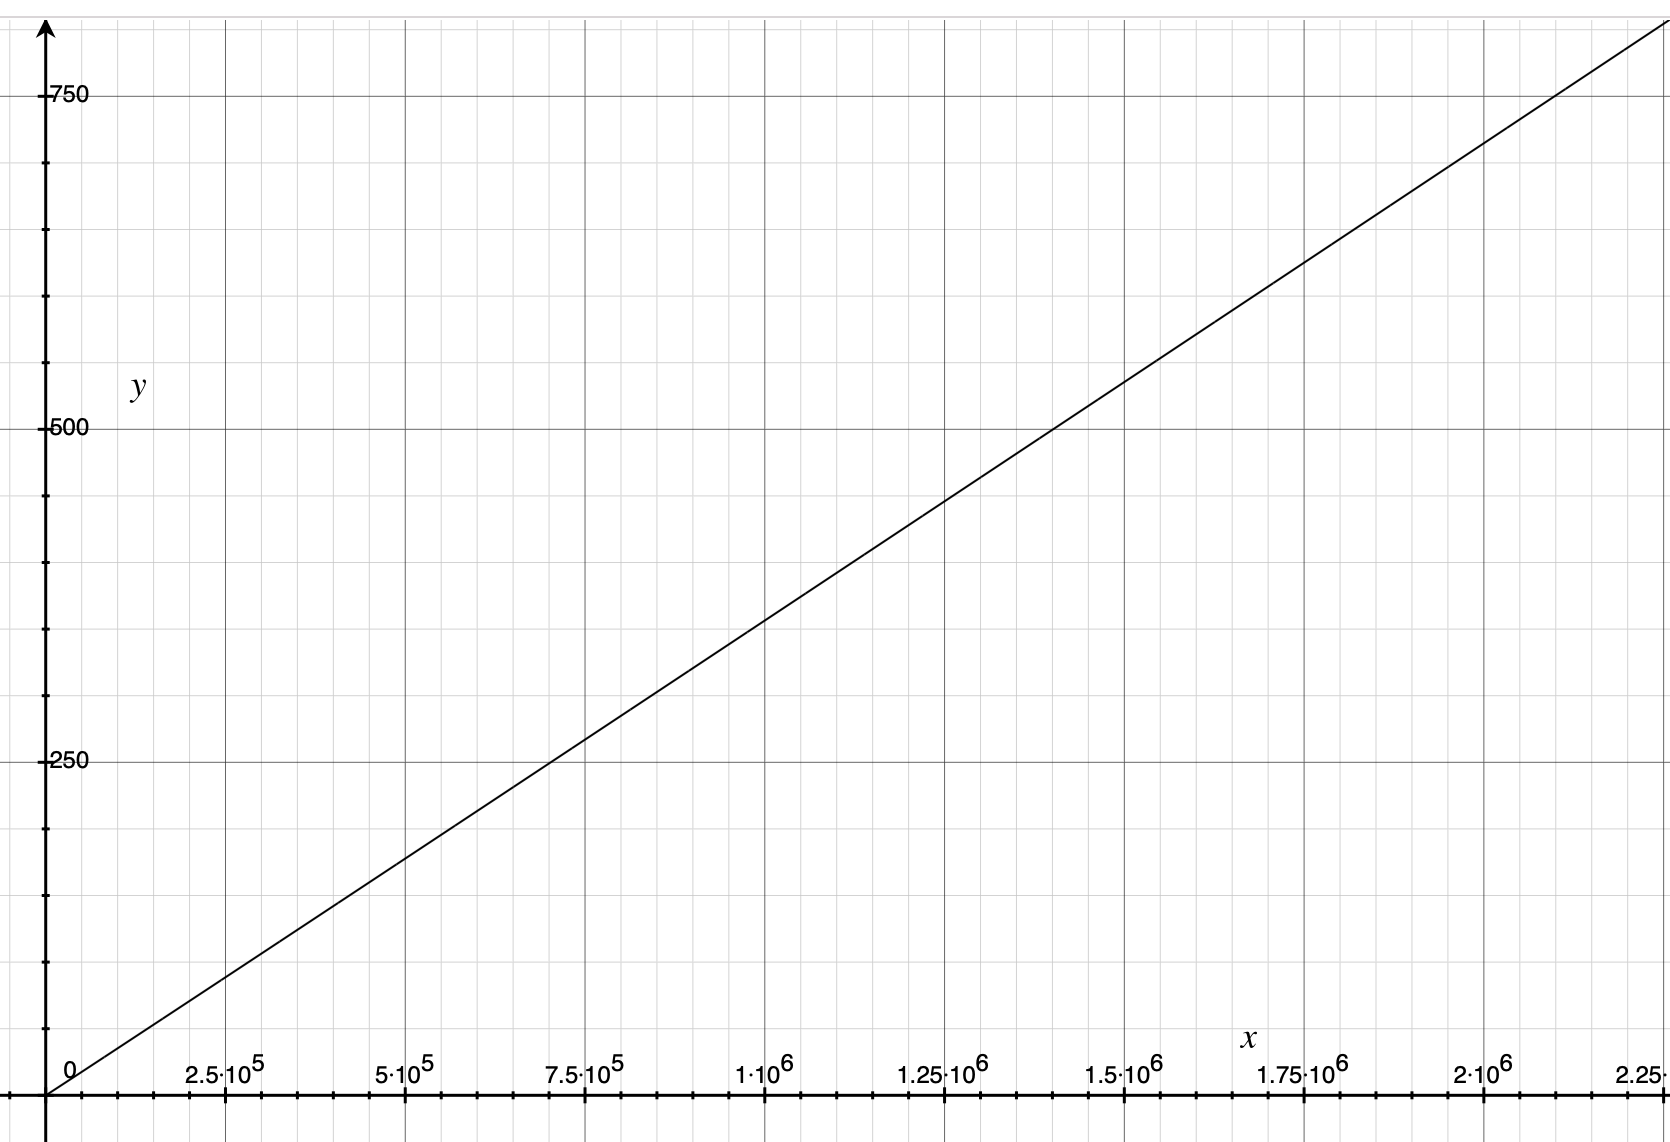
But to be honest, at present I temporarily did not understand the physical meaning of these two formulas, there is an understanding of the big brother please tell ~ Is the use of the logarithmic function of convergence to determine the length of the formula, and then set the average speed of linear growth, after deducing the distance formula?
At present, only the total distance and length of the slide are determined, so how is the intermediate process to update the position.
|
|
The position and velocity of the SPLINE stage are determined entirely by the preset SPLINE_POSITION spline curve, which is an array of size 101 that stores the coordinate values of a curve sampled 100 times on average, initialized as follows.
|
|
It’s hard to imagine what it looks like by looking at the code, so let’s look at the image directly.
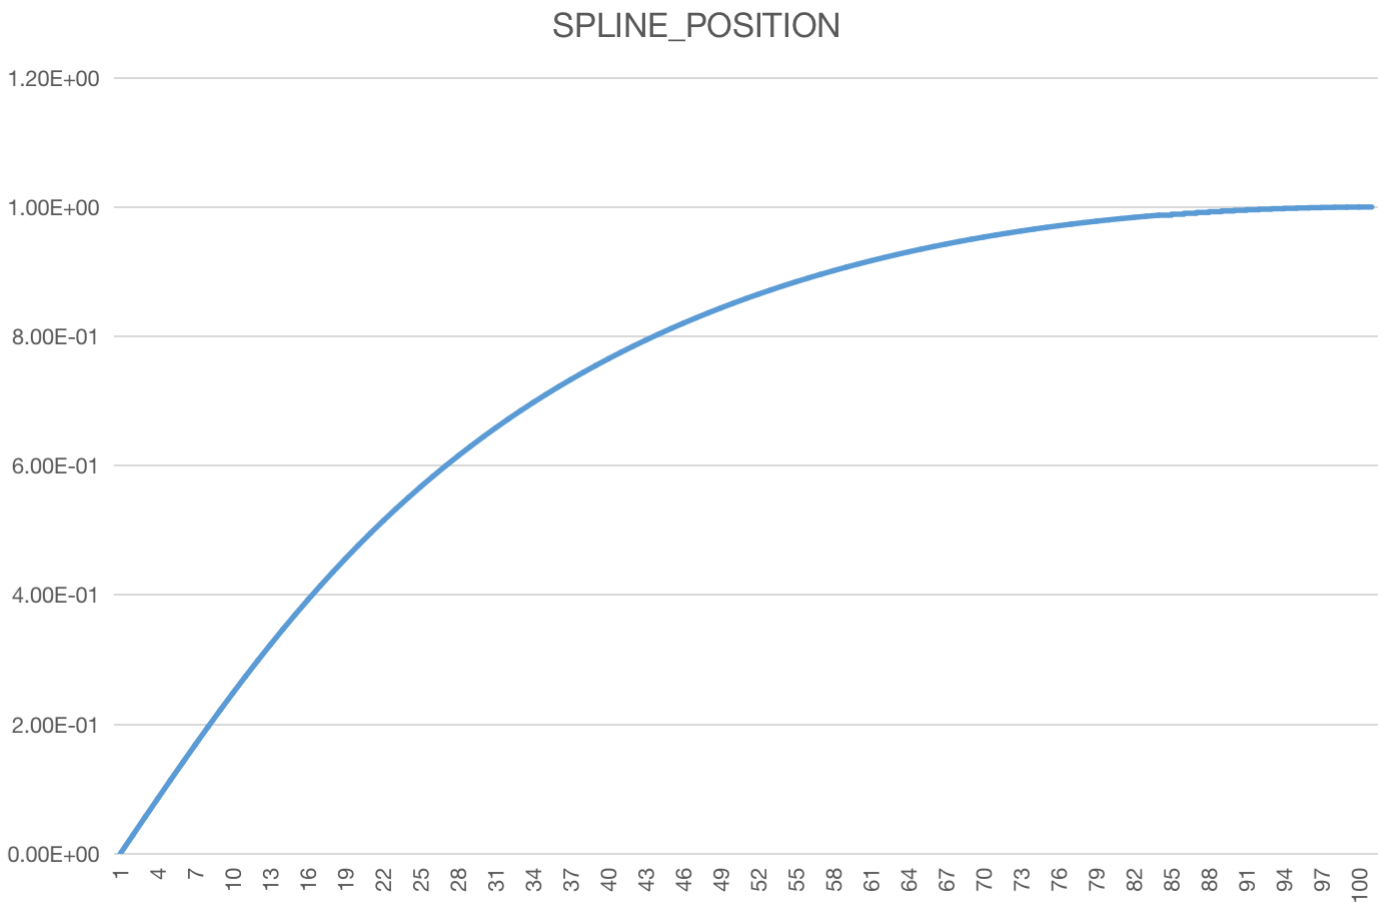
That is, SPLINE and startScroll are much like each other in that the position curve is determined by a preset curve that maps the preset curve to the true distance, except that instead of using an interpolator curve, SPLINE uses a slow-stop spline curve.
3.2.2 BALLISTIC
At the end of the SPLINE phase, the next phase is continued by continueWhenFinished: the boundary crossing phase (provided that the boundary has been reached). The principle of the boundary crossing phase is relatively simple, it is a period of uniform deceleration (until the velocity drops to 0), and the default acceleration a is -2000.0f. The initialization logic to enter the BALLISTIC phase is in onEdgeReached.
|
|
Speed.
$$v_t=v_0+at$$
Distance.
$$s_t=v_0t + \frac{at^2} {2}$$
There is a small complaint here, the acceleration is fixed at 2000, which is too small, that is, if the crossing speed is 10000, then it takes 5s for the speed to drop to 0. A 5s animation you all know how long it means, right?
3.2.3 CUBIC
As we know from the previous section, the speed is reduced to 0 at the end of the BALLISTIC phase, and we finally come to the last section, where startSpringback is called from continueWhenFinished as the initialization of CUBIC.
|
|
The time calculation still uses the logic of uniformly accelerated linear motion, imagining a section with initial velocity 0, acceleration a, and distance delta.
$$delta=\frac{(v_0 + v_t)} {2} t$$
Then.
$$ v_0=0,v_t=at $,那么 $ delta=\frac{at^2} {2} $,$ t=\sqrt{ \frac{2*delta} {a}}$$
In the update method, the core logic of updating CUBIC is.
|
|
The core logic is this 3.0f * t2 - 2.0f * t * t2 , which is actually a more commonly used cubic curve.
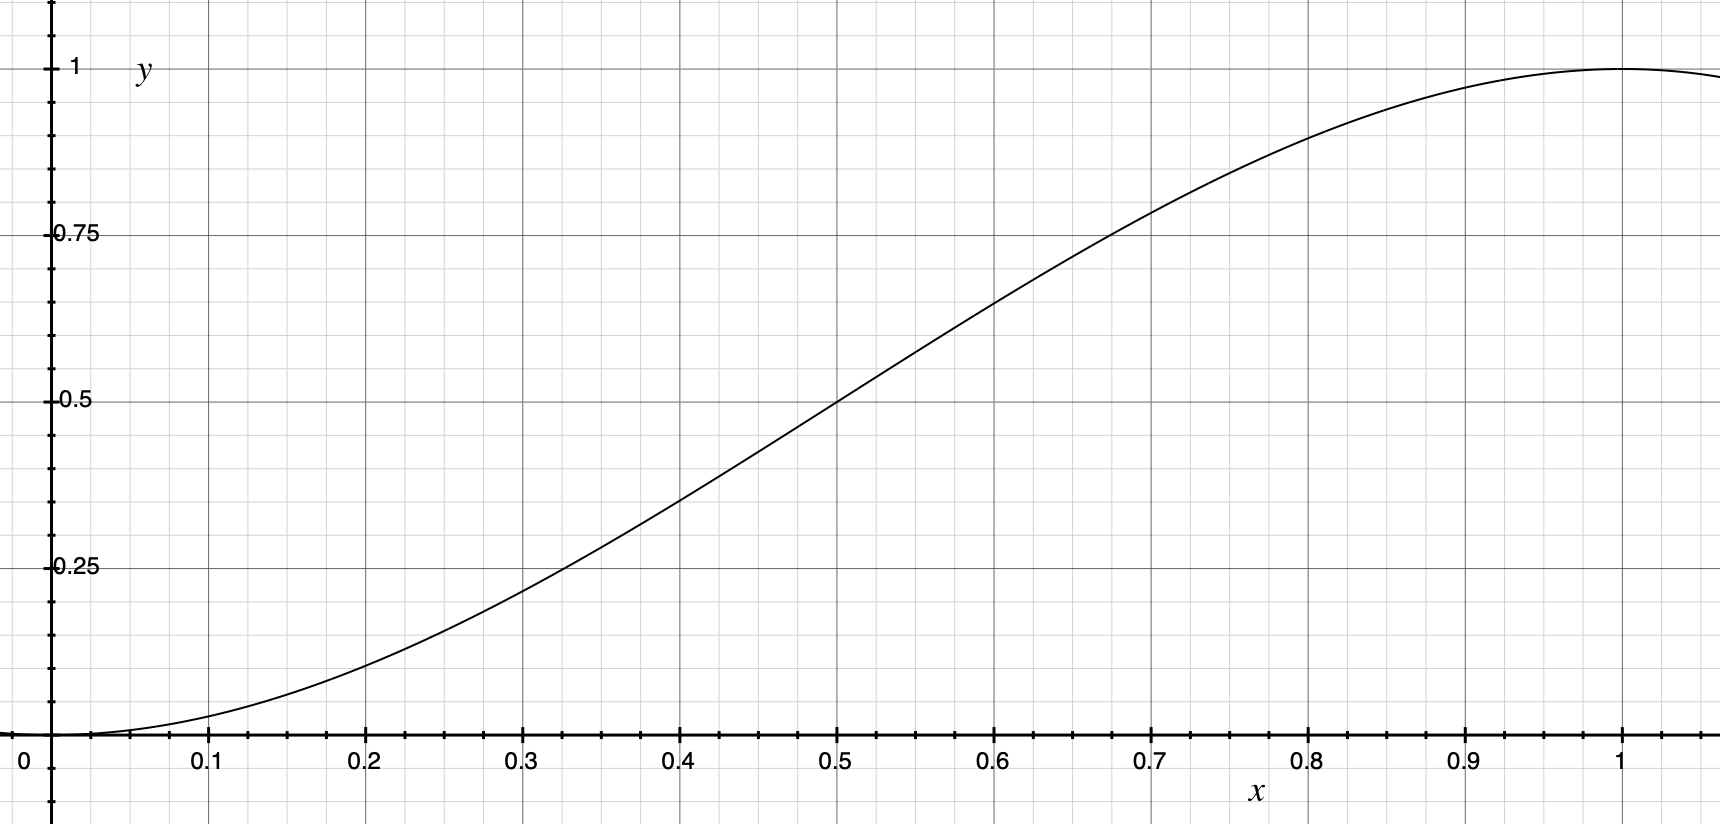
In the interval [0, 1], it is a slow-in and slow-out curve. At this point, the motion law of CUBIC is also clear, which maps the time to the interval [0, 1] at a fixed time, and then maps the y-coordinate to the actual position.
4. Summary
So far, we have finally looked at the curves of startScroll and fling stages, as for springBack and some other cases, they are more or less the same, so we won’t go into details.
Many times OverScroller just uses a fixed curve to map the real curve, such as startScroll, SPLINE and CUBIC, so if you want to change the effect, is it possible to modify the shape of the curve? But can a curve really perform better at different speeds? Maybe we have to have a lot of practice and experimentation to make a section to make the user comfortable sliding.