
Although I can not be regarded as a Go standard library “purist”, but in the test is still mostly based on the standard library testing package and go test framework, in addition to the need to mock time, basically did not use a third-party Go testing framework.
Recently looked at the Apache arrow code, found that arrow’s Go implementation of the use of testify project organization and auxiliary testing.
|
|
During the same period, I saw on grank.io that the program testify was ranked #1 overall.
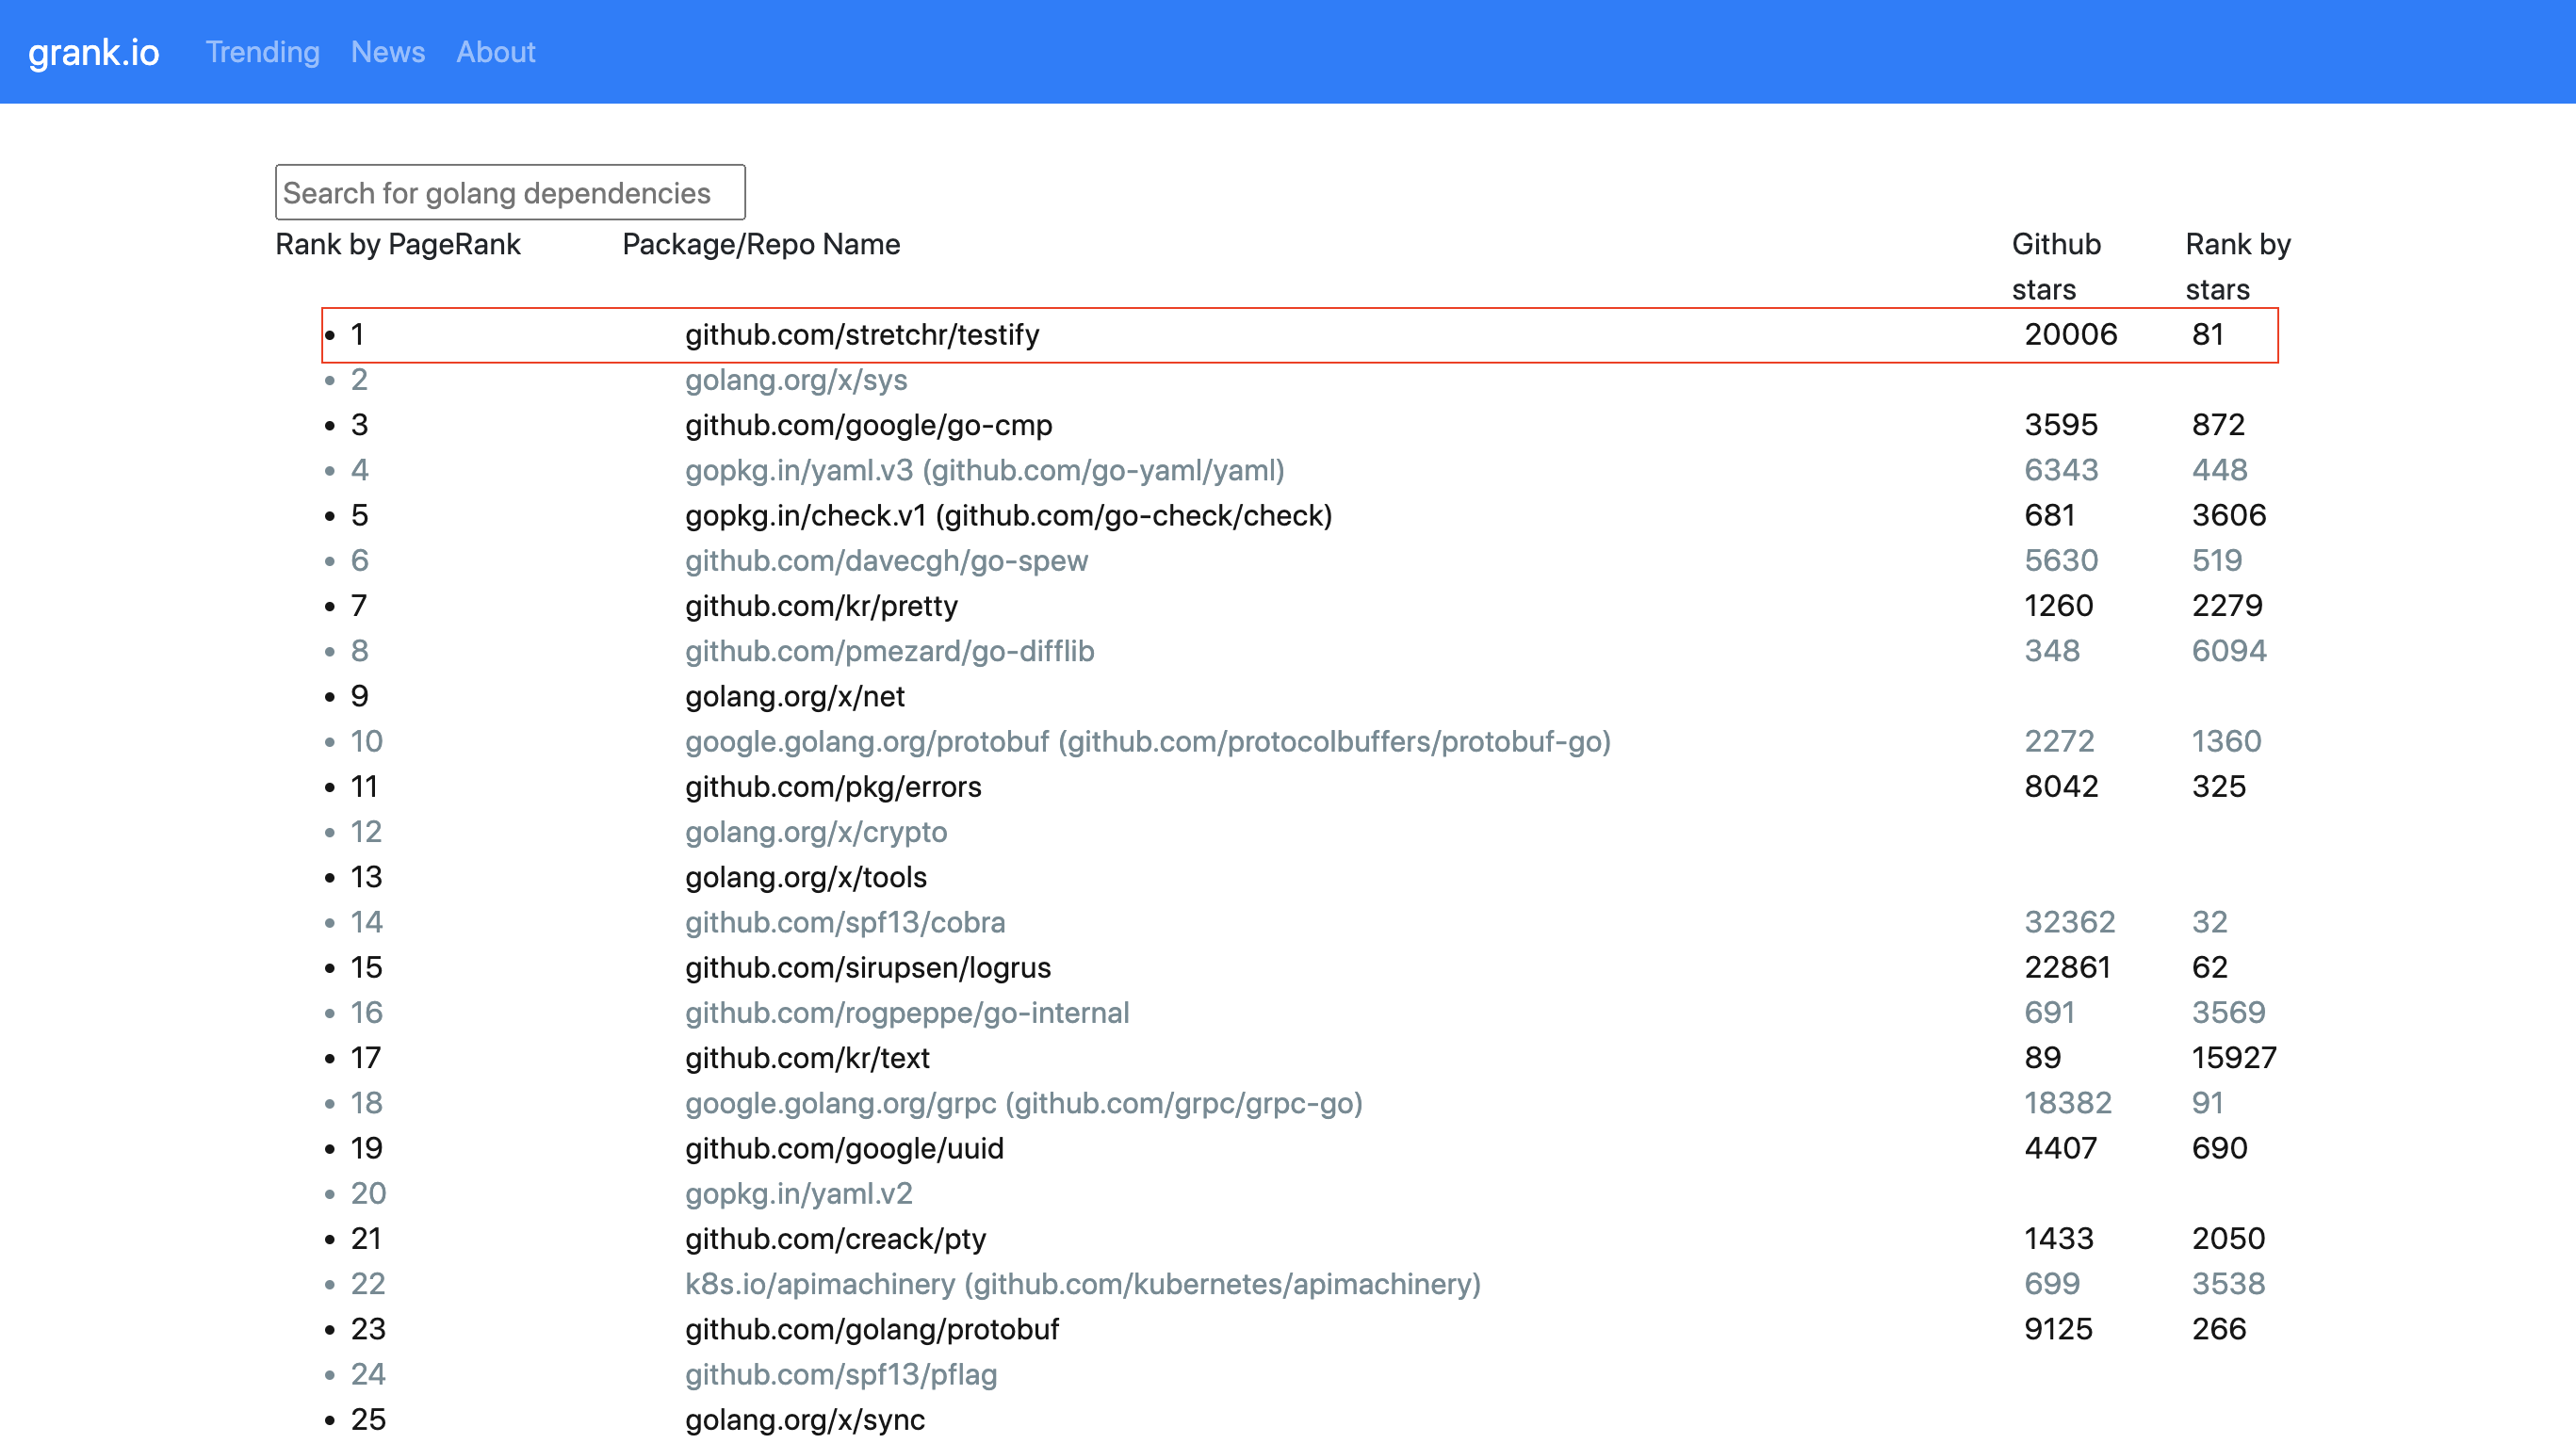
This shows that the testify project has a wide audience in the Go community. What makes testify stand out from the many go test third-party frameworks? What are the differentiating features of testify? How to better utilize testify to assist our Go testing? With these questions, I wrote this article about testify for your reference.
1. testify Introduction
testify is a testing framework for Go language , and go testing package can be well integrated together , and run by the go test driver . testify provides features that can assist Go developers to better organize and more efficiently write test cases to ensure the quality and reliability of the software .
The wide acceptance of testify by the community is inextricably linked to the simplicity and independence of the packages in the testify project. Here is the directory structure of the testify package (after removing the codegen and deprecated http directories for code generation).
The package catalog name directly reflects the functionality and features that testify can provide to Go developers:
- assert and require: assertion toolkit to assist in making test result determinations;
- mock: assist in writing mock test toolkit;
- suite: provides suite this layer of test organization.
We’ll start with a brief introduction to some of the important packages that can be used independently of testify. We’ll start with the assert and require packages, which are the least complicated to use. They are in the same category, so they are covered in the same section.
2. assert and require packages
When we write Go unit test cases using the go testing package, we usually use the following code to determine whether the result of the target function execution is as expected.
Thus, if the test case has a lot of outcomes to determine, there will be a lot of if xx ! = yy and Errorf/Fatalf and so on. Anyone who has had some experience programming in other languages will surely say at this point: it’s time to use ASSERT! Unfortunately, the Go standard library, including its experimental library (exp), does not provide packages with assert mechanisms.
Note: Check and CheckEqual provided in the testing/quick package of the Go standard library are not asserts; they are used to test whether two function arguments have the same output given the same input. If they are different, the outputs result in outputting different inputs. In addition, the quick package is FROZEN and no longer accepts new Features.
testify for Go developers to provide the assert package , it is very convenient .
The assert package is very simple to use , the following is the use of assert common scenarios:
|
|
We see that the assert package provides Equal, Boolean, reverse assertion, assert package provides dozens of assertion functions, here can not be one by one, choose the most suitable for your test scenario on the assertion.
In addition, it should be noted that, in Equal on the slices for comparison, the comparison is the slices of the underlying array to store the contents of the same; on the pointer for comparison, the comparison is the pointer to point to a block of memory data is equal, rather than whether the value of the pointer itself is equal.
Note: The underlying implementation of assert.Equal uses reflect.DeepEqual.
We see that the first parameter of the assert function provided by the assert package is an instance of testing.T. If the assert function of the assert package is used multiple times in a test case, we have to pass in an instance of testing.T each time, as in the following example:
|
|
This is very verbose! The assert package provides an alternative, as shown in the following example:
|
|
Note: We can certainly optimize the above example further using table-driven testing.
require package can be understood as the assert package “sister package”, require package implements the assert package to provide all the exported assertion functions, so we will be in the above example of the assert to require after the code can be compiled and run normally (see require /require_test.go).
So what is the difference between the require package and the assert package? Let’s take a brief look.
When using assertions from the assert package, if a particular assertion fails, that failure does not affect the execution of subsequent test code. For example, we deliberately changed some of the assertion conditions in TestAssert to fail:
Run the test in assert_test.go again and we will see the following result:
|
|
We see: both failed test assertions are output!
Let’s switch to make the same changes under require/require_test.go and execute go test, we get the following result:
We see that the test ends when the first failed assertion is executed!
This is the difference between the assert package and the require package! This is somewhat similar to the difference between Errorf and Fatalf! In the require package, if the assertion function fails to execute, the test will exit and the subsequent test code will not be able to continue to execute.
In addition, the require package has another “feature”, that is, its main code (require.go and require_forward.go) are automatically generated:
testify’s code generation uses a template-based approach, the specific automatic generation principle can refer to “A case for Go code generation: testify”.
3. suite package
The Go testing package does not introduce the concept of testsuite or testcase, only Test and SubTest. For developers who are familiar with xUnit’s way of organizing tests, this absence is “awkward”! Either build this structure yourself based on the testing package, or use a third-party package implementation.
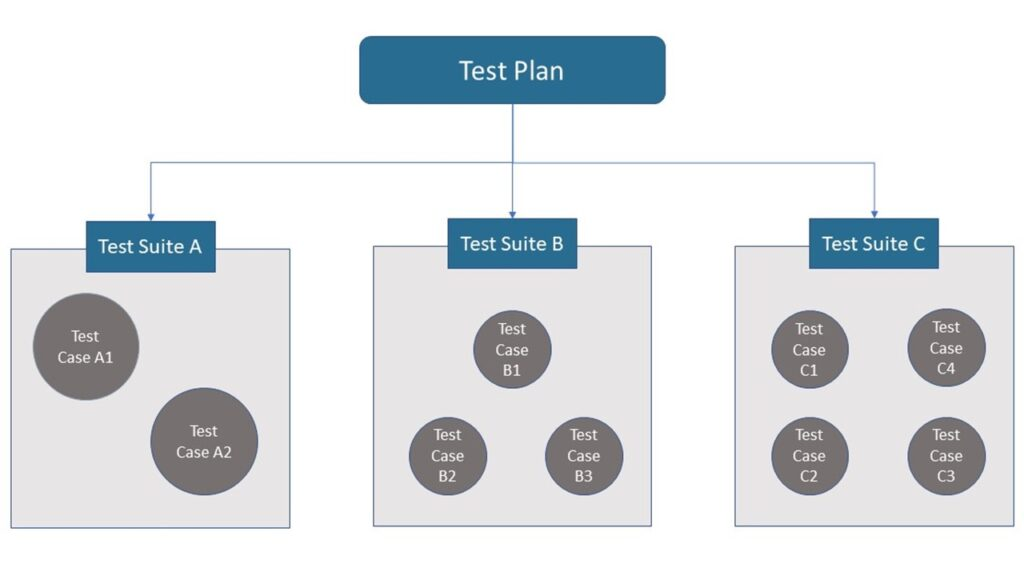
The testify suite package provides us with a way to organize our test code based on a suite/case structure. Below is an example of how the suite structure defined by testify suite can be fully parsed (adapted from the ExampleTestSuite example in the testify suite package documentation).
|
|
To see what the test structure defined by the testify.suite package looks like, let’s run the above code.
|
|
It’s a lot of information, so let’s take our time!
To build a test suite using testify, we need to define our own structure types that have embedded suite.Suite, such as ExampleSuite in the example above.
testify is compatible with go testing and is executed by the go test driver, so we need to create an instance of ExampleSuite in a TestXXX function, call the Run function of the suite package, and give the execution rights to this Run function of the suite package, and the subsequent execution logic is the execution logic of the Run function of the suite package. logic. In the above code, we have defined only one TestXXX and executed all the test cases in ExampleSuite using the suite.Run function.
The execution logic of the suite.Run function is roughly as follows: get a collection of methods of type *ExampleSuite through reflection, and execute all the methods in the collection whose names are prefixed with Test. testify treats each method prefixed with Test in the user-defined XXXSuite type as a TestCase.
In addition to the concepts of Suite and TestCase, the testify.suite package also “pre-built” a lot of callback points, including Suite’s Setup, TearDown; test case’s Setup and TearDown, testcase’s Setup and TearDown of suite; Setup and TearDown of test case, before and after of testcase; Setup and TearDown of subtest, these callbacks are also executed by the suite.Run function, and the execution order of the callbacks can be seen through the execution results of the above example.
Note: subtest is to be executed via the Run method of XXXSuite, not via the Run method of the standard library testing.
We know: the go test tool can select which TestXXX function to execute via the -run command line parameter. Considering that testify uses the TestXXX function to pull up a test suite (XXXSuite), from the testify perspective, it is possible to select which XXXSuite to execute via the go test -run, provided that all the test cases of only one kind of XXXSuite are initialized and run in a TestXXX.
To select the XXXSuite method (i.e. test cases in the eyes of testify), we can’t use -run anymore, we need to use the new -m command line option added by testify.
Below is an example of executing a test case with the Case2 keyword only:
|
|
In summary, if you use testify’s Suite/Case concept to organize your test code, it is recommended to initialize and run only one XXXSuite in each TestXXX so that you can select a specific Suite to execute with -run.
4. The mock package
Finally, let’s take a look at one of the advanced features that testify provides to assist Go developers in writing test code: mock.
As I mentioned in the previous article, try to use make object instead of mock object. mock is a test stand-in that is difficult to understand, limited in its usage, and doesn’t give developers enough confidence.
But “existence is reasonable”, obviously mock also has its use of space, in the community also has its fans, since testify provides a mock package, here is a brief introduction to its basic use.
Let’s use a classic repo service example to demonstrate how to use testify mock, such as the following code example:
|
|
We are going to provide a UserService service through which you can create Users and also get User information by ID; Behind the service is a UserRepository, you can implement the UserRepository in any way, for this we abstract it to an interface UserRepository.The UserService depends on the UserRepository to make its two methods CreateUser and GetUserById work properly. Now we want to test these two methods of UserService, but we don’t have an existing implementation of UserRepository available and we don’t have a fake object for UserRepository.
|
|
We create a new struct type UserRepositoryMock based on mock.Mock, which is the mock UserRepository we are going to create.We implement its two methods, unlike the normal method implementation, in the methods we use the method Called provided by mock.Mock and its return value to Mock provides the method Called and its return value to fulfill the parameter and return value requirements of the CreateUser and GetUserById methods.
The implementation of these two methods of UserRepositoryMock is rather “patterned”, in which Called receives all the parameters of the external method, and then constructs a return value that satisfies the return value of the external method through the return value args of Called. The return value construction is written in the following format:
|
|
CreateUser as an example, it has two return values int and error, that in accordance with the above writing format, our return value should be: args.int (0) and args.Error (1).
For the complex structure of the return value type T, you can use the assertion method, the writing format becomes:
|
|
Then take the return values *User and error of the construct GetUserById as an example, we follow the writing format of the complex return value construction to write, the return value should be args.Get(0).(*User) and args.Error(1).
With the Mock UserRepository, we can write test cases for the methods of the UserService:
|
|
These two TestXXX functions are also written in a very similar pattern. Take TestUserService_GetUserById for example, it first creates instances of UserRepositoryMock and UserService, and then utilizes UserRepositoryMock to set up the input parameters and return value of the GetUserById method that will be called.
This way when GetUserById is called in the service.GetUserById method, it returns the user address value set above and nil.
After that, we just use the assert package to assert the returned value against the expected value as we would in a regular test case.
5. Summary
In this article, we explained the structure of testify, a third-party auxiliary testing package, and highlighted the usage of the relatively independent Go packages: assert/require, suite, and mock.
The assert/require package is a full-featured test assertion package. Even if you don’t use suite or mock, you can use the assert/require package alone to reduce the number of lines of if ! = xxx lines in your test code.
The suite package, on the other hand, provides us with an xUnit-like implementation of Suite/Case’s test code organization, and this solution is compatible with the go testing package, driven by go test.
Although I don’t recommend using mock, testify mock also implements the basic functionality of the mock mechanism. And the article did not mention is that the combination of mockery tools and testify mock, we can for the interface for the target under test to automatically generate testify mock part of the code, which will greatly improve the efficiency of writing mock test.
To sum up, testify is a very useful project that can assist Go developers to write and organize test cases efficiently. Currently testify is planning to dev v2 version , I believe that in the near future the landing of the v2 version can bring more help to Go developers.
The source code for this article can be downloaded here.
6. Ref
https://tonybai.com/2023/07/16/the-guide-of-go-testing-with-testify-package/