In high-level programming languages, a control-flow statement is a class of statements used to control the flow of program execution, hereafter referred to as control statements. They can execute corresponding blocks of code according to conditions or loops, or jump to specified locations to execute code.
Common control statements include:
- Conditional statements: execute different blocks of code according to conditions, such as if statements, switch statements, etc.
- Loop statements: Repeatedly execute the corresponding block of code according to the condition, such as for statement, while statement, etc.
- Jump statement: Jump to the specified position to execute the code, such as break, goto statement.
- Exception handling statements: Handle exceptions that occur during program operation, such as try-catch statements, throw statements, etc.
Control statements are an important means of implementing program logic in programming languages, and they help programmers to implement complex algorithms and logic. The types and usage of control statements supported by different programming languages may vary, but they all serve a similar basic purpose, namely to control the flow of program execution.
The number of control statements in Go is one of the smallest in the mainstream, with the main ones being if, for and switch. goto, defer and panic/recover statements are of course also classified as control statements, and the latter are all important tools for implementing program logic in Go. But these latter statements are not the focus of this article. In this article I will focus on Go’s if, for and switch statements.
1. if statements
Let’s start by looking at the if statement.
The if statement is used to execute a block of code based on a condition and is the most commonly used control statement in the Go language.
The basic syntax of the if statement is as follows:
I’ll share the following 3 main points about if statements.
1.1 Implicit code blocks
Let’s look at the following code:
After reading this code, do you think it will compile properly? The Go compiler tells us that it will compile and run correctly. But many people will question why the variable a declared in the first if statement, the variable b in the second if and the variable c in the third if are all accessible in the final else statement.
To answer this question, it is necessary to clarify the implicit code block and scope rules of the if statement. The above code is equivalent to the following code:
|
|
With this expanded code, we can clearly see that the final else statement in the first code is essentially an innermost else, and that the scope of the variables a, b and c can be covered by the else.
1.2 Using self-use variables
When using if statements in Go, developers often struggle with which of the following forms to use:
The first is recommended here, i.e. “self-using variables with if expressions”, rather than defining temporary variables outside of if. This is because in addition to the advantages of brevity and slightly better readability, the former also has the advantage of placing a in an if-implicit code block, which limits the scope of the variable a to a minimum, thus avoiding conflicts caused by variables being named the same in different code sections. In turn, this makes the code implementation clearer and easier to understand.
There is another point in the above code that may confuse beginners, and that is the operator precedence of a < 10 && ok, whether it is (a < 10) && ok or a < (10 && ok). To avoid confusion for subsequent readers of the code, it is recommended to use parentheses to clarify the order of computation when evaluating the value.
1.3 The happy path principle
One of the conventions of using if statements in Go is to follow the happy path principle. By happy path, we mean that code is made more readable and maintainable by minimising indentation and avoiding excessive nesting of if statements or else-if statements. Following the happy path principle makes your code easier to read and understand, and the flow of execution becomes clearer.
The happy path means that code should be left-aligned as much as possible, with minimal nesting, as shown in the following diagram:
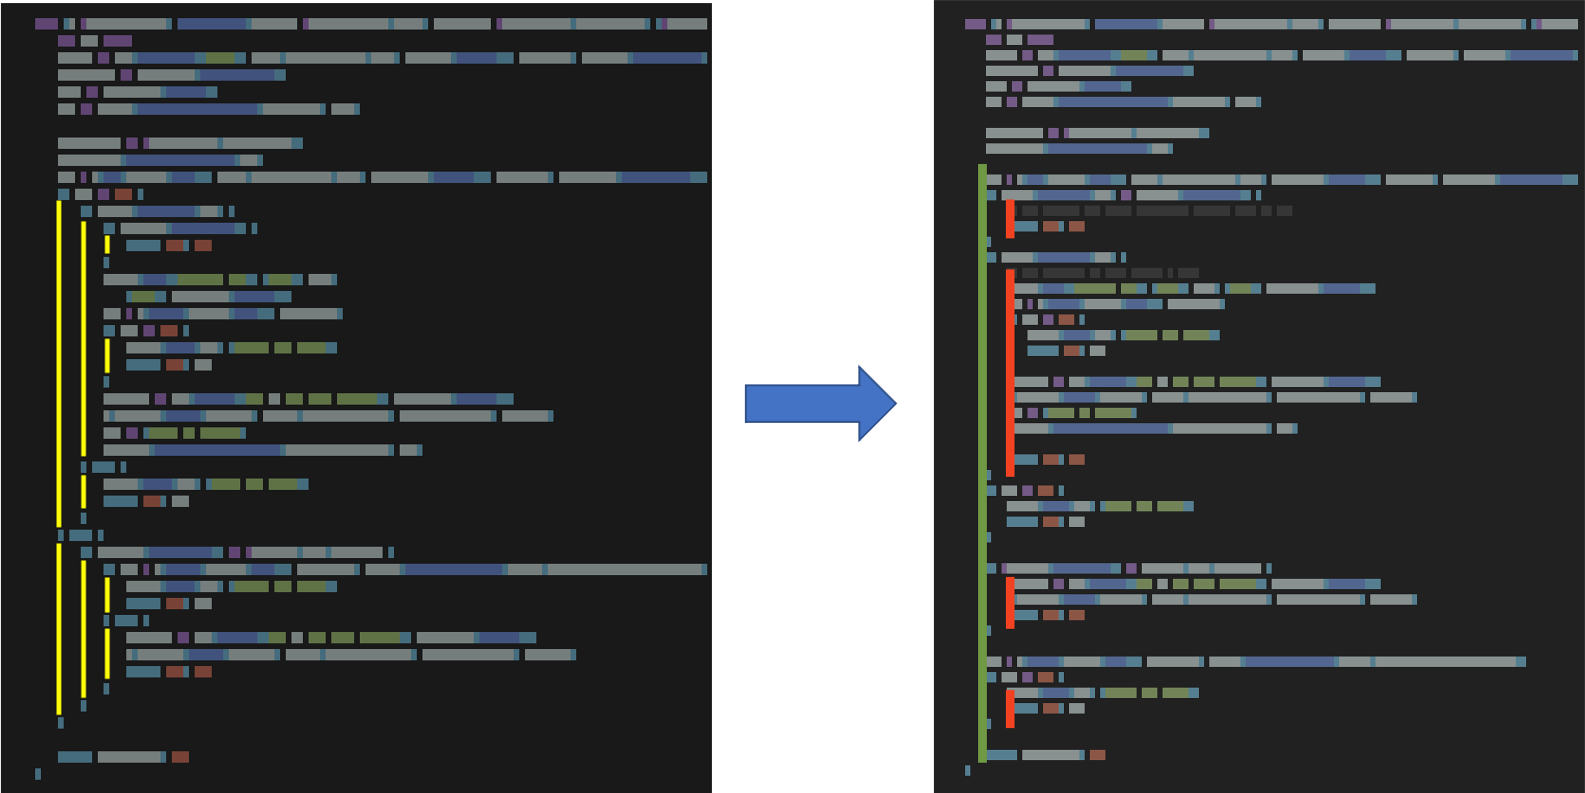
In coding practice, there are several techniques to satisfy the happy path:
- Reduce the use of else, else if;
- Avoiding the use of nested if statements;
- Quick returns. Use return in the body of the if statement to return from the function, rather than continuing with subsequent processing.
2. for statements
The for statement is second only to the if statement in terms of frequency of use for control flow statements. Here are some of the features of Go’s support for looping statements.
2.1 Only one for loop
Go believes in “only one way to do something”, and I wonder if this is the original reason why Go only offers one form of for statement (as opposed to other mainstream programming languages that offer while, loop, do…while, etc.).
Some typical uses of Go’s classic for statement are as follows:
2.2 for range is not optional
It would be inaccurate to say that go only has a for statement. go also has a for range variant. However, this for range variant is not optional. Some traversals cannot be completed without a for range, for example:
2.3 Continue and break with and without a label
In Go, it is possible to use continue and break statements with a label in a for loop, as well as continue and break statements without a label as we normally know them. However, the differences between them should be borne in mind:
-
continue and break statements without labels
The continue and break statements without a label can only be used in the current for loop statement, and their scope is limited to the inside of the current loop body. When the continue statement is executed, it skips the current loop and goes directly to the next loop; when the break statement is executed, it ends the current loop and jumps directly out of the loop body.
-
continue and break statements with labels
The continue and break statements with a label can be used in multi-layered nested for loops that jump out of the specified loop body. When the continue statement with a label is executed, it skips the current loop in the specified loop body and goes directly to the next loop; when the break statement with a label is executed, it ends the specified loop body and jumps directly out of the loop.
The following is an example of using a break statement with a label:
1 2 3 4 5 6 7 8 9 10 11 12 13 14 15 16 17package main import "fmt" func main() { outerLoop: for i := 1; i <= 3; i++ { for j := 1; j <= 3; j++ { if i == 2 && j == 2 { // Jump out of the specified loop body fmt.Println("Jumping out of the outer loop") break outerLoop } fmt.Printf("i=%d, j=%d\n", i, j) } } }In this example, we have used a break statement with a label to jump out of the outer loop, thus avoiding the need to continue executing the outer loop. If we had used a break statement without a label, only the inner loop would have been jumped out, not the outer loop.
2.4 Pitfalls
Although Go has only one form of for statement, there are a number of possible ‘pitfalls’. Here is a list of some typical pitfalls.
-
Loop variable reuse
Have a look at the following code:
What is your expected output? What is the actual output? Run it in the go playground and get the following:
Why does it output this result? You’ll see if I make an equivalent transformation of the above code:
We see that instead of redeclaring the variables i, v each time we loop, we only define one copy throughout the loop. This is why all goroutines output “4 5”, and the Go team is working on an optimisation for this problem, which may be “fixed” naturally in a later version of Go.
-
Copy in range expression
Let’s look at another piece of code:
In your expectation, the output of the above program would look like this:
But actually run it and you’ll see that the real output looks like this:
After this transformation, we know that the for range traverses a copy of a and that changes to a will not affect subsequent traversals.
Therefore, be very careful when using arrays and slices as the set of containers to be traversed after range.
-
break does not jump out of the for code block
There is also a pitfall to be aware of when using for in conjunction with switch statements, take a look at the following code:
Executing this code, the output is 12, which does not match the first even 6 we expected. What is the reason for this? From the fact that the output is 12, it seems that the break did not jump out of the for loop, causing it to continue to the end.
Remember: the Go specification specifies that a break statement without a label breaks execution and jumps out of the innermost for, switch or select within the same function where the break statement is located. This is the reason why the program did not execute as we expected.
3. switch statement
Finally, let’s talk about the switch statement. In Go, the switch statement is also a common control flow statement that can execute different blocks of code depending on different conditions.
Since Go switch execution semantics do not execute the next case block by default, the above switch statement is equivalent to a multiple if-else statement, but is easier to understand and more readable than multiple layers of if else. In such cases, we recommend using switch instead of multiple if-else statements.
3.1 The order of case statements
A switch statement will usually have a number of expressions, and the order in which these expressions are evaluated is clearly defined, i.e. starting with the switch expression, and then the individual case statements are evaluated in a top-to-bottom, left-to-right order. Remembering this order will help you to analyse the semantics of the execution of switch statements.
3.2 Flexibility of the switch case
The Go switch statement has many optimisations in terms of syntax semantics compared to its ancestor, the C Switch statement, resulting in more flexibility, the main ones being:
-
support for comparison of any value, unlike C which can only use int or enumerations
-
case code blocks support lists of expressions
-
The next case statement will not be executed by default
That execution semantics in C of executing the next case statement by default causes us to need to use break to jump out of the switch in each case, Go fixes this semantics, see the following example:
This example will only output the “Second case block” and will not execute the code in case 3.
To explicitly tell the next case block to be executed, you would need to use fallthrough, and obviously Go uses the common execution logic as the default semantics, i.e. jumping out after each case; C does the opposite.
3.3 type switch
Not available in other languages, or unique to Go, type switch is a special syntax for interface type expressions, and the syntax format is relatively fixed.
If the dynamically typed values stored in the interface variables are not required, they can also be simplified as follows:
4. Summary
The Go control flow statements are not as extensive as they could be, but they are sufficient to help developers implement different types of program logic. When writing code, you need to choose the right control statements for your specific needs and be careful to follow the conventions and specifications for using the various control statements.
5. Ref
https://tonybai.com/2023/05/27/control-flow-statement-in-go/